Showing posts with label Holiday. Show all posts

Friday, December 31, 2010

Happy New Year 2011


As you read this my family and I are on the road to our celebration destination!

This year we are celebrating the new year in another "New" State.  Last year it was New York -- This year it's New Jersey.  (I'll be sure to post some pictures when we return.)

So, have you made your New Year's Resolutions?  Will you scrap more? Make more Cards?  Spend more time with family?

It's funny, as a child I made a lot more new year resolutions than I did as an adult.  Somehow time always seem to plow by so fast, resolutions were forgotten until the year was in progress.  In 2010, I said one thing I would do would be to make my resolutions earlier, LOL.  So, in an effort to do that, here they are:

1.  Scrapbook more -- somehow life has taken me farther away from my scrapbook pages.  I love scrapbooking because I enjoy looking back over the journaling and pictures, yet in the past few years I've done more "looking over" than "putting together".

2. Make more cards -- I have been making more cards than scrapbooks, yet sadly it's not nearly enough when I need to resort to using some store bought cards.  This year I plan to finish off the store bought cards and move to only handcrafted cards.

3. Get more organized -- I already have some organizational items in place, this year I plan to continue developing things that work and finding ways to change what doesn't into something that does work.

4.Try to remember to be on the other side of the camera more often -- as I look back over our pictures, I realize I'm missing, and it's not that I wasn't there (LOL) -- I was just always on the other side of the camera.  Time to figure out how to put me into my own scrapbooks so that one day my daughter and her children can "see" I was there too.  Don't forget to put you in your scrapbooks, it's something many of us often miss.  Your family will love seeing you!

Well, that sums up my list of four...but I always think of things the day of and as the week progresses -- this year will be no different, I will continue to come up with things I want to reinforce or change, it's all tradition!

Wishing you and yours a wonderful and prosperous year!

Thursday, December 16, 2010

17 Days of CTMH Christmas Cards - Day 16: Circle Ornament Card

Advent Cards to College Day 16 - 2010


I wanted to create a card that looks like an ornament with ornaments on it so I used the CTMH Adron-able Stamp set (D1446) on a circle card (cut with my Cricut of course).

You can find the directions to this card in my Google Documents titled: Adornable Circle Ornament Card

Wednesday, December 15, 2010

17 Days of CTMH Christmas Cards - Day 15: A row of Snow Friends

Advent Cards to College Day 15


Interesting thing about this card.  When I first made it -- I didn't have it colored in and I liked it that way, then I thought well maybe it's too plain, so I colored it in.....oh, no!  I rethought maybe I should have left them plain.  So, time being what it is this time of year, I put it off for a few days before I went back to the beginning and started all over and made the plain one.  Well, as it turns out -- I ended up liking the colored one better, LOL.  So, now I have another to color, hehehehe...

You can find the supplies and directions to this card in with my Google Documents: Snow Friends

Only two more days of cards.  See you tomorrow with a Circle Ornament card. :)

Tuesday, December 14, 2010

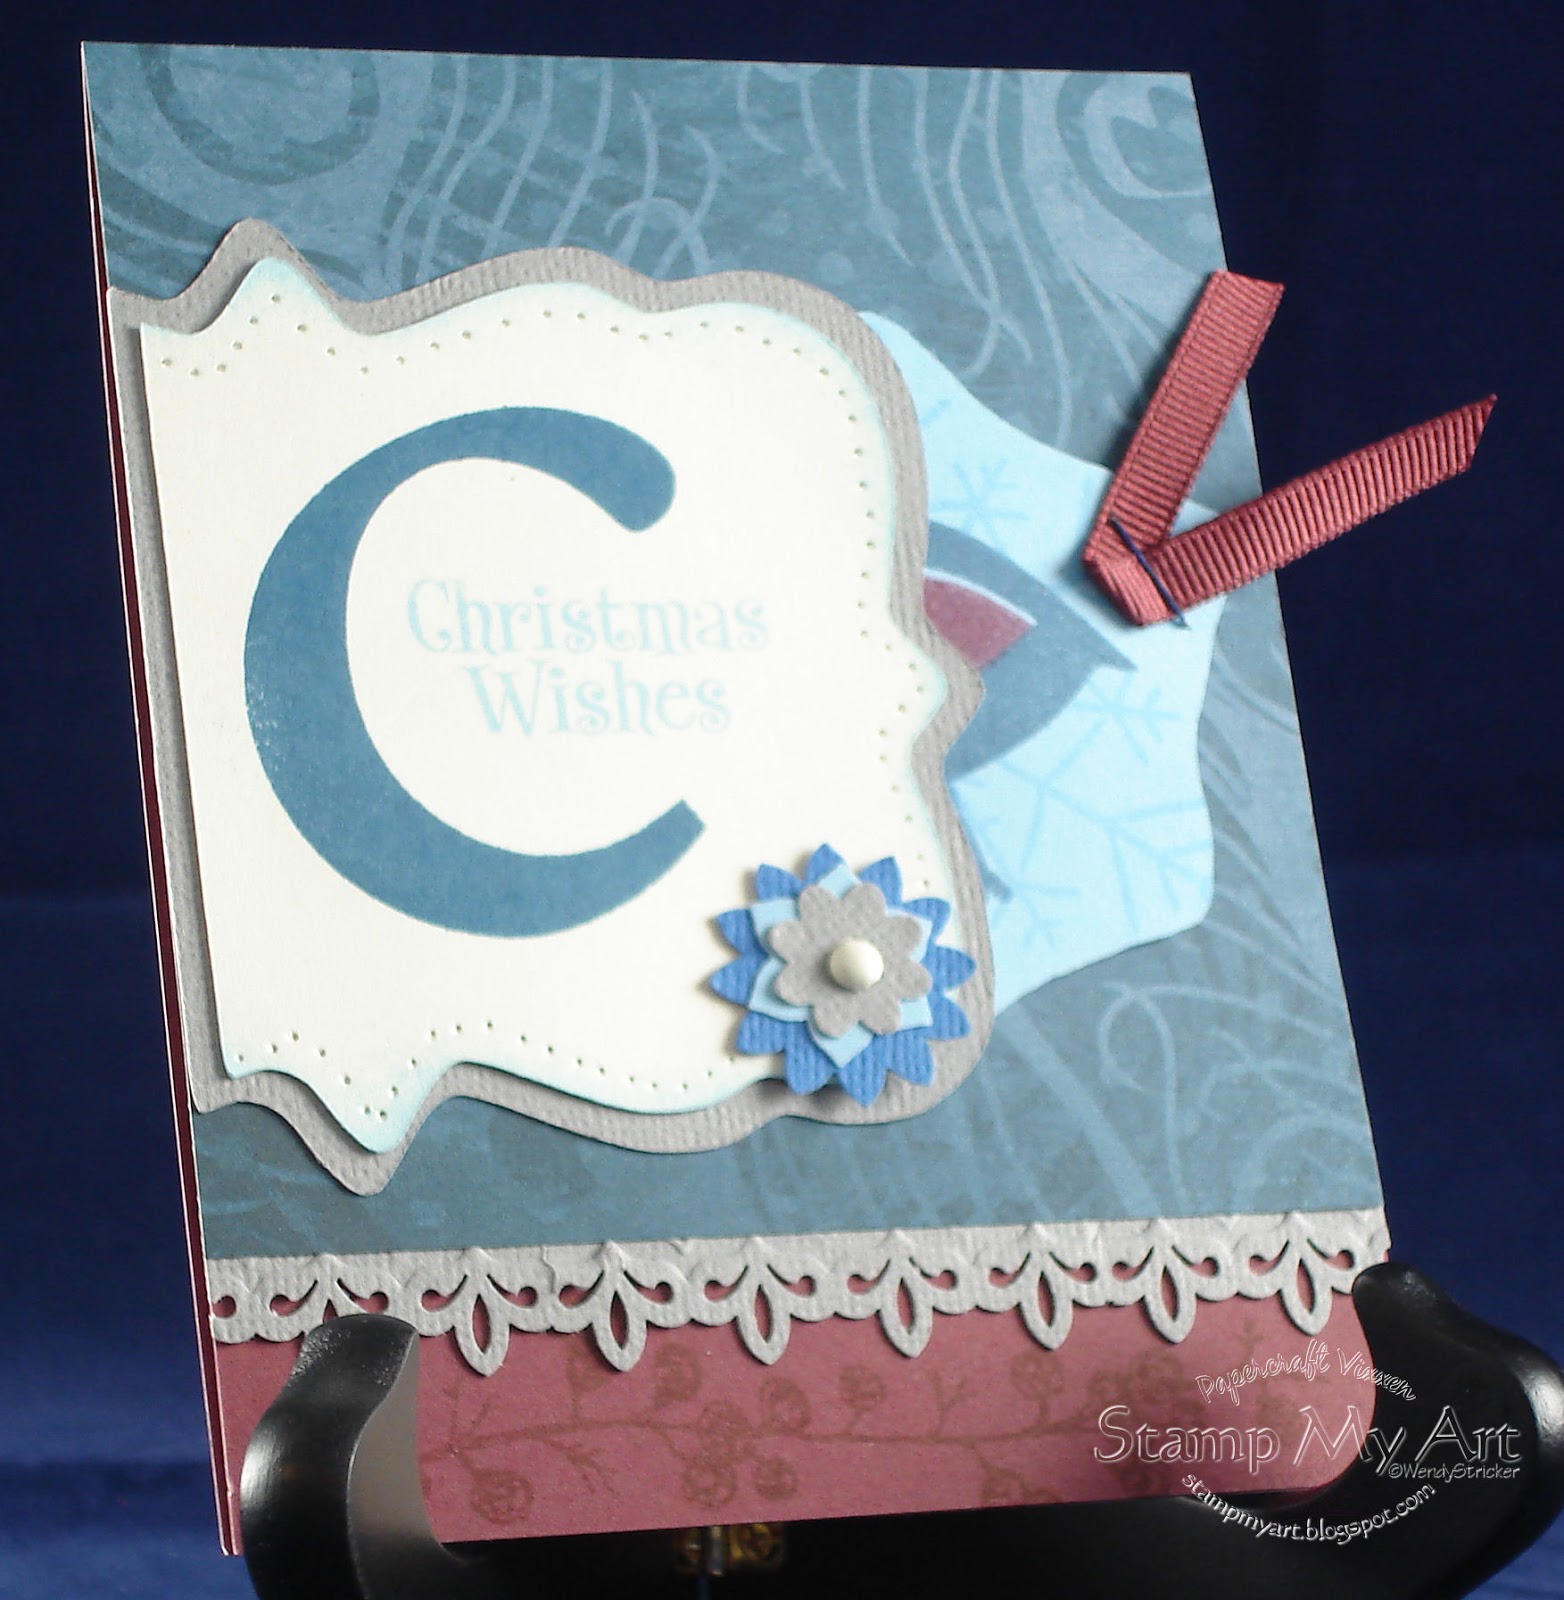
17 Days of CTMH Christmas Cards - Day 14: Hidden pull-out Tag


Advent Cards to College Day 14 - 2010


Supplies
CTMH Stamp sets: Tannenbaum (B1361) pg 43 AW IB 2010; Bird Basics (D1338) pg 41 summer 2010 IB;Winter Wonder (D1241) NLA; Feathery Flakes (D1317) NLA; Solos “C” (B1227) NLA
CTMH Exclusive Inks: Sky (Z2194), Pacifica (Z2192), Cranberry (Z2116)
SU Boho Flowers punch
CTMH Piercing Tool set
Sponge
Stapler
CTMH Vineyard Berry Grosgrain Ribbon
CTMH Cardstock: Vineyard Berry, Grey wool, Moon Struck, Sky, Colonial White
CTMH Colonial White Brads
CTMH Paper Pack Magnifique
Fiskars Border embossing/punch: All-a-Fluer

Traditional A2 Card with opening at top

Monday, December 13, 2010

17 Days of CTMH Christmas Cards - Day 13: Snow Days Shaker Card


Advent Cards to College Day 13 - 2010


Supplies
CTMH Stamp Sets: Snow Days (C1420) pg 23 AW Idea Book, Snow Flurries (D1384) pg 41 AW Idea Book
CTMH Exclusive Inks: Spring Iris & Black
CTMH Card Stock: Spring Iris & White Daisy
CTMH White Daisy Grosgrain ribbon
Fine Sandpaper 220 grit
Martha Steward Mica
Chunky Glitter (mix with the mica to create the snow)
Foam strips to create the pocket area for the shaker part of the card
Terrifically Tacky Tape
Piece of plastic to create window area
Cuttlebug embossing folder

Sunday, December 12, 2010

17 Days of CTMH Christmas Cards - Day 12: Pull Out Tag

Advent Cards to College Day 12 – 2010


Supplies
CTMH paper pack Magnifique, Colonial White CS, Sky CS, Vineyard Berry CS, Grey Wool CS, (scrap) Moonstruck CS,
CTMH Vineyard Berry grosgrain ribbon
CTMH Exclusive Inks: Vineyard Berry, Sky, & Pacifica
CTMH Stamp sets: Bird Basics (D1338, page 41, Summer 2010 IB), Feathery Flakes (D1317, NLA), Tannenbaum (B1361, pg 43 Autumn/Winter 2010), Winter Wonder (D1241, NLA), Solos “C” (B1227, NLA)
Fiskars border punch/emboss: All a-fleur
Stapler: color your staples with a sharpie to blend in with the project
Piercing tool and pad
Sponge
Cricut Cartridge: Accent Essentials, page 79
Boho Flowers SU punch
Colonial White Brads
A post it or some other sticky to create a mask


For printable complete supplies and directions you can get them at my Google Documents: Pull Out Tag Card

See you tomorrow for Card 13!

Saturday, December 11, 2010

17 Days of CTMH Christmas Cards - Day 11: Jingle Tree

Advent Cards to College Day 11 - 2010


Today is another card that had caught my eye from the CTMH website.  Although the decorative papers are no longer available for purchase, I love the pretty blue hues in the Jingle paper packet.  …And it was sitting here in my stash just waiting for some love.

Other supplies used were the chocolate grosgrain ribbon, pewter brads, and gems.  I used a white Gel pen to create faux stitching and a Stampin’ Up punch for the ornament.  Since it was the picture that caught my attention I didn’t go looking for the directions or supplies, I just created the card with a 6”x6” card base and went from there.

I can’t believe we are doing day 11 already!

Friday, December 10, 2010

17 Days of CTMH Christmas Cards - Day 10: All the Best Wishes

Advent Cards to College Day 10 - 2010


Today is another card created by CTMH consultant Jean.  I love the way she brought all the greens together.  Normally I'm not a real big "green" fan -- but this card is just gorgeous in person. :)  This is again using the CTMH Level 2 Mistletoe Paper pack.  What a great way to combine the green side of the snowflake papers from the pack with the cuttlebug dry embossing folder!  It looks so sharp -- what you don't see well from the picture though is the tiny little sparkles to add just a touch of glitz to this card in the lower corner of the sentiment and on the ornament.  Cardstock used: Colonial White and Olive.

Tomorrow -- back to self-created cards with recipes. :)  see you then!

Thursday, December 9, 2010

17 Days of CTMH Christmas Cards - Day 9: Dahlia Fold

Advent Cards to College Day 9 - 2010

Today's card is also designed by another CTMH Consultant (Jean) at the Christmas Card Extravaganza we had back in September.  Isn't it fantastic how a few circles can turn into such a beautiful flower!


This card uses the CTMH Mistletoe Level 2 paper pack (Fall 2010) and Colonial White CS.  My favorite papers in this pack are the red snowflakes, used here in this Dahlia fold card, and the green musical notes.  Card base is 5.5"x4.25"

Wednesday, December 8, 2010

17 Days of CTMH Christmas Cards - Day 8: Snowflakes

Advent Cards to College Day 8 - 2010

Today is another card from a workshop -- the Christmas Extravaganza we had back in September.


I cannot take credit for the design -- that was Crystal, but it was a fun card to make.  I love the Sky Blue used on this card (new color this season).  Another new thing this season is the stamp set used -- C1428, Ice Cyrstals: I just love snowflakes!  This is such a cool stamp set -- the snowflake over to the far right is a built it yourself snowflake.  ...and what a great sentiment to add for that someone special!  Supplies are simple besides the inks and stampset -- just some White Daisy cardstock to create a 5.5"x4.25" base and the one inch squares for the 3 snowflakes.  Add some gems and you have a simple card with a lot of sparkle and pizazz!

Monday, December 6, 2010

17 Days of CTMH Christmas Cards - Day 6: Heartfelt Christmas Tree

Advent Card to College Day 6

(Sorry about the picture -- I had already mailed off the card before I realize there was glare on the right side there.)


Supplies & Cutting Directions
BASE 5" x 7" - CTMH New England Ivy (I used older CTMH paper that was textured and each side a different shade of the same color.  It matches with the New England Ivy on one side, but the other side is a much lighter color of green -- I miss those papers, I've been saving them in my stash for a special occasion -- what's more special than my daughter! :) )  You will have to cut a lighter shade of green to 2" x 7"
Barn Red CS - 2.25" x 4"
Colonial White CS - 2.25" x 4"
CTMH  Stamp Set: Heartfelt Christmas (C1378 from Fall 2009)
CTMH Exclusive Inks: New England Ivy & Vanilla Cream
CTMH Exclusive Inks Marker: Watermelon
Zig-Zag Corner trimmer by EK Success
CTMH Glitz (Stardust) Liquid Glitter
6 eyelets
Paper trimmer with scoring blade or some type of scoring system
Pop Dots -- the extra tall version

Crop-a-dile or some way to set your eyelets.

Assembly Directions
1. Stamp sentiment in lower left corner of card base with the Vanilla Cream.
2. Using your scoring blade or bone folder, score every 1/4" on the 2" x 7" piece (see picture for direction of score marks) - sponge lightly with the New England Ivy across the ridges created from scoring.  Attach to card base with the 6 eyelets and your Crop-a-dile (or eyelet setter).
3. Stamp tree using New England Ivy on both the Barn Red and the Colonial White pieces.  Cut out the tree from the Colonial White piece (cut off the dots, only leave the tree).  Color in hearts.
4. Use corner rounder on the Barn Red piece, then attach to slightly off center towards right on card base.
5. Now apply Glitz to color in the dots on the Barn Red Piece.
6. Put tall pop dots on cut out tree and attach direction over the barn red piece, then apply Glitz to all the dots on the tree as well.


Sunday, December 5, 2010

17 Days of CTMH Christmas Cards - Day 5: Oh, Tannenbaum

Advent Cards to College Day 5 - 2010


You can't really see it well from the picture (you have to look very close) but the entire tree is pierced with the paper piercing tool -- it looks cool in person, especially since it's raised off the surface to help the light shine through.  However, today's card is not my own creation.


Today's card is actually from the CTMH website video -- Art & Soul®: Stencil, Sparkle, and Shine and can be found at:  http://stampmyart.myctmh.com/MyCTMH/CTMHTV.aspx  -- once there, you can watch the video, it's a little later on in the program, and just below that there is a link to see the materials used (including the Wishes Card Confidence Program).

If you need any supplies to create your card be sure to check my CTMH site where you can shop on line any time, and remember this month is Plenty for $20 special.  Make any $20 purchase on my website and get a FREE stamp set -- yes, you read that correctly -- a FREE stamp set.  Here are the details:

Place an order of $20 or more* on your Consultant’s MyCTMH website from December 1–31, 2010, and we’ll reward you with a popular, retired D-size stamp set for FREE! Talk about getting more for your money—the free stamp set is valued at $22.95 US / $26.95 CAN! We’re sure you’ll be thrilled with the set we pick out for you. We’re also giving you FREE shipping/handling and tax on your free stamp set. That’s a lot of Plenty for your Twenty! Grab Plenty for Twenty in December by visiting your Consultant’s MyCTMH website and making a qualifying purchase today!

See you tomorrow with a new card for Advent Cards to College Day 6!

Saturday, December 4, 2010

17 Days of CTMH Christmas Cards - Day 4: Snow Friends

Advent Cards to College Day 4 - 2010

Sending a Christmas card each day my daughter is away at PSU.  We are up to day 4.  She'll be coming home on the 17th, so follow me through each day as I make a new card.  At the end I have a special surprise that I've made for my daughter (so she has somewhere to keep all the cards).  You'll have to wait since I don't want to spoil her surprise. :)

Today's card was inspired by Jeanette Lynton.  I saw this lovely card on the CTMH website and just had to make it for my daughter (well something very similar since I couldn't find the measurements and directions; it's not saying they're not out there somewhere, I was just in a hurry to beat the postal carrier to the mailbox, LOL).


Supplies
CTMH Stamp Sets: Snow Friends (D1244), January Word Puzzle (D1268), & Spot On Backgrounds (D1280)
CTMH CS: White Daisy, Cocoa, Desert Sand, Juniper
CTMH Exclusive Inks: Juniper, Cocoa

CTMH Ribbon: White (Grosgrain) & Hollyhock
CTMH sanding kit
CTMH Brads: Pewter & Basic Collections
CTMH Glitz Stardust Liquid Glitter
Cricut Cartridge: When it's Cold Outside (2009-2010)
Cuttle Bug Embossing Folder: Ice Crystals

From Base up
Card base is 5.5" x 5.5"
Juniper layer is 5.25" x 5.25" and is embossed with the Ice Crystals, then sanded
Desert Sand layer is 5.25" x 3.5"
White Daisy is 5.25" x 1 5/8"
Juniper is 5.25" x 1.25" and is stamped with Juniper using the Spot On Backgrounds
Cocoa Layer is 2.75" x 2.75"
Daisy White Layer is 2.5" x 2.5 and is stamped in Cocoa with the Snow Friends and sponged with Coca, color as desired.
Use Cricut to cut snowflakes.  Attach snowflakes with the brads and put two brads on the snowman's belly for his buttons, then assemble card as shown.  Finally, apply Glitz to the brads (except the snowman).

Thursday, December 2, 2010

17 Days of Christmas Cards - Day 2

Advent Cards to College Day 2 - 2010

It's day two of the Advent Card adventure! Today's card uses Close to My Heart's October Stamp of the Month Magic Moments and B & T papers from the Mistletoe Paper Packet.


Supplies
CTMH: Mistletoe Paper pack (level 2), ribbon – I used Hollyhock Twill, Liquid Glass, Brown Bag
and Tulip Exclusive Inks, Share the Magic Stamp Set – D1443 (SOTM – October)
Others: Martha Stewart Pine Branch Punch, Chalks, Adhesive, Glue Dots

The directions and supplies can be found in printable form at Window to Rudolph Cards Google Document.

Wednesday, December 1, 2010

17 Days of Christmas Cards - Day 1

Advent Cards to College Day 1 - 2010

Time to start a new school year of Advent Cards.  Those of you following me last year might remember it was my daughter's first year of being away at college.  This, then led my daughter to the realization that she would not be able to participate in the yearly Advent Calendar.  Life changes and you have to find ways to change with it.  So began our new plan:  I decided I would make cards and send them to her every day.  For the entire time she is at college during the month of December I send a card for each day. ...and so started the new custom of Advent Cards.


Today I sent off the first card, it's one I actually posted earlier -- you can find it at this link: Old World Santa

I will post a new card tomorrow.  Today's picture is of my beautiful daughter from her 19th birthday back in September when we went up to visit her for the weekend.

Friday, October 29, 2010

Halloween: Trick-or-Treat Toppers

Wow! It's sure good to have my computer back. I can finally post on the blog again, LOL.  That's why the Tri-fold Card post took so long.  I actually started it in September, but was waiting for my computer back so I could post the pictures. It took longer than I expected, but it's back now. Yay!


Halloween is always a fun time. I love to see the children dress up and come visiting.  It's a great way to see how the neighborhood children change over the years.

Today's project is super easy. This year I've made treat toppers and filled cello bags with the goodies.  I was able to complete 40 while watching Survivor.  You'll love how simple and quick it is to complete, but shows the kids you're thinking of them! Have fun!  Oh, yeah, how do you like those pumpkins? heeheehee...

Supplies
CTMH Black CS 5" x 4" (folded in half to 2" x 5")
CTMH Orange CS (NLA - replaced by Sunset) 4.75" x 1.75"
Purple CS (an older color I had, so I thought I'd use it up) 4.5" x 1.5"
D1319 Creepy Cobwebs Stamp Set

Stamp on the purple CS, then layer purple on orange and orange on Black, fold in half; fill cello bag with treats; place topper over opening and staple closed.

Wednesday, October 27, 2010

Too Cute to Spook - Triangle Trifold Card

October has arrived and I get to create something with the cool new Hooligan papers and little Hooligan monsters. I really like how the card came together and I just love the Hooligan colors!


This card sounds more complicated than it is to create, but it's kind of hard to describe so I needed to make lots of steps.  It's an adorable square card that opens in an nontraditional way.  The two triangle left and right panels make it appear square, but when you open the card it's actually extra long.


Supplies
CTMH Black CS (1386)
CTMH Goldrush CS (1243)
CTMH Hooligans L2 Paper Packet (X7129B)
CTMH Hooligans L2 Assortment (Z1332) - smallest monster
CTMH Sunset Exclusive Inks Stamp Pad (Z2129)
CTMH Colonial White Exclusive Inks Stamp Pad (Z2168)
CTMH Black Exclusive Inks Marker (Z2305)
CTMH Creepy Cobwebs Stamp Set (D1319)
CTMH Troublemaker Stamp set (B1360) for the "too cute..." words (available exclusively w/ the Hooligans Workshop Kit)
Cricut with Accent Essentials Cartridge - Shape Accnt48s (page 79), cut at 2" on CTMH
8" Halloween Ribbon, cut one end at an angle and tie a knot on that end
Also needed, scoring blade or some way to score and adhesive

Cutting Directions
Black CS Base - 3.5" x 10.5"
B&T Duo Paper Square - 3.25" -- cut diagonally
Black CS Large square - 2.75"
B&T Duo Paper Square - 2.5"
Black CS smaller square - 2.25"
Goldrush CS smallest square - 2"


Putting Card together (see card picture for correct placement)

1. First, score your card base at 3.25" and 7" (creating 3 equal sections)
2. Fold the two flaps in and then back out for the next step.
3. On the two end pieces, you will score from the score line at an angle out to the corner (see open version of card for how the folds will look
4. Fold the angled pieces away from the card.  (you will now have 2 valley folds, the first two and two mountain folds, the last two on the angle); fold card closed
5. Now, glue the 2 B&T 3.25" triangles to each triangle section
6. Next, open card and stamp "Too Cute to Spook" saying towards bottom of center inside of card
7. Stamp cobweb with Sunset Exclusive Inks on the Accnt48 shape; also sponge edges with Sunset and write Happy Halloween in black
8. Now for the front while the inside is drying...Sponge the edges of the Goldrush square with the Sunset Ink.
9. Now, stack and attach the 3 remaining squares, plus the Sunset, in descending order ending with the Sunset.
10. Here's the slightly tricky part.  Place your square set where you want but do not attach yet.
11. Apply adhesive to HALF the square (on an ANGLE), so the adhesive will go in a diagonal fashion from the top corner to the bottom corner, and place on card front to the correct triangle half -- do not glue entire back or card will not open
12. Attach the Halloween Ribbon towards the bottom (leaving a little of the Goldrush showing on the bottom) -- wrap a small amount (without the knot) to back so you don't see end and attach ribbon securely with adhesive or pop dots only to half of card (or your card will not open)


Tuesday, September 28, 2010

Christmas Extravaganza 2010

This year's Christmas Card Extravaganza was another success!


Thirty-six participants made a total of 12 beautiful cards each as they rotated between 7 different consultants.


Everyone had the opportunity to try out the new papers, stamp sets, embellishments and other new supplies recently released this September.


Door prizes and give-a-ways peppered the room with the exciting possibilities of the new products and creative ideas.


A great day with plenty of opportunities to meet new people on the venture too.


The first 6 cards were made in the morning session before lunch break.


Around noon everyone stopped to enjoy a lunch break with food supplied by the consultants and then it was back for the 2nd half of the day to make the remaining 6 cards.


If you didn't make it to this year's Extravaganza, you'll want to mark your calendar for next year so you too can get in on all the creative fun!


Join us next September to make your very own stash of Christmas cards.


You'll get some great ideas and have a head start on those special cards for those extra special people in your life.


Look at all the smiles on everyone -- you know it was a great day!


Be sure to visit my website at stampmyart.myctmh.com to check out the new Idea Book for all the great new products!


LinkWithin

Related Posts with Thumbnails