Wednesday, October 28, 2009

Halloween Treat Holder

Well, I finished my first video tutorial and posted it on YouTube. It took longer to edit than to come up with the idea, LOL. .....and waaaaay longer to edit than it takes to make a couple dozen of these. :) Funny thing is, I now found I didn't actually have to upload to YouTube to get it to post here, LOL. Learning something new everyday. I didn't realize that a lot of places like here on Blogger and FaceBook actually let you upload direct. That's very nice of them to supply that space for us. :)

So....onward with the supplies and the video. Enjoy!

Supplies
Black Card stock -- 8-1/2" x 2-3/4"
B&T Duo paper (Tinkerin) -- 2-1/2" x 3-1/2"
Black Card stock -- 1-3/4" x 2-1/4"
B&T Duo paper (Tinkerin) -- 1-5/8" x 2-1/8"
Vanilla Cream card stock -- 1-1/2" x 2"
Ribbon 2" to 3" (depends on how long you want it - I used 2")
Citrus Green Exclusive Inks Marker
New England Ive Exclusive Inks Ink Pad
Merry Monsters Stamp Set (B1333)
Dauber Duo sponge applicator
Scissors
Stapler
Adhesive
candy or treats to put inside.


Prepare all your supplies ahead of time and have pre-cut...it makes it go a lot faster when you start putting things together, especially if you are doing a classroom with 30 students. I do all my cutting first, then stamp all my first image (you can't really do the second image - the words - until you start putting this together)

If you need any Close to My Heart supplies check out: My Craft Closet and then contact me to let me know what you need. :)

Have fun making your treat holders! :)

Sunday, October 18, 2009

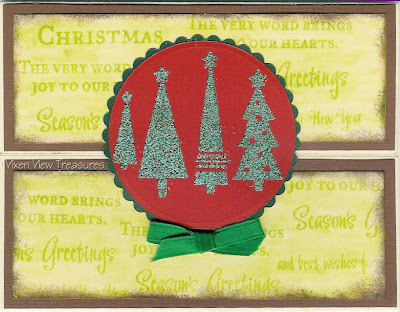
Duo-Open Christmas Card

(this looks better in person)


To create this card you will need the following supplies:
Card base: vanilla cream card stock cut to 8-1/2" x 5-1/2"
2 Chocolate card stock rectangles 2" x 5-3/8"
2 Vanilla Cream card stock rectangles cut to 1-3/4" x 5-1/8"
1 evergreen scalloped circle 2-3/4"
1 cranberry circle 2-1/2"
(Cuttlebug, Cricut or die cutting system is needed)
1 six-inch piece of green ribbon
chalk
Stamp sets: D1366 Holiday Trinkets (Autumn/Winter 2009) and D1243 Peace on Earth (or other stamp set your choice)
VersaMark
Chocolate ink pad
Sponge or dauber-duo
pop dots or glue dots


1. Crease Vanilla CS (card stock) base at 2-1/8" and 6-3/8" ( this will create two front flaps, like a window opening)
2. Stamp the trees in the middle of the Cranberry CS and emboss with green embossing powder ( I used Verdigris)
3. Layer the stamped Cranberry CS over the scalloped edge Evergreen CS
4. Using the VersaMark ink pad stamp your saying randomly on each of the narrow Vanilla Cream CS pieces. Set aside for just a bit
5. Glue both pieces of of Chocolate CS to the front flaps, centering them and showing just a bit of the Vanilla Cream CS edge.
6. Now take your chalk color (I used green) and a Q-tip, cotton ball or applicator and gently rub all over the surface of the Vanilla Cream rectangles where you previously stamped with the VersaMark to make the stamped image "pop" from the page. You will have color all over, but the words/image will "pop" from the surface.
7. Using your sponge/dauber duo and your Chocolate ink pad, sponge the edges of both Vanilla Cream rectangles.
8. Attach the two Vanilla Cream CS pieces to the front flaps on top of the Chocolate CS, leaving a boarder all the way around.
9. Attache the circle combo to the top half of the card, being careful not to put adhesive on the bottom portion (or the card will not open, LOL)
10. Add sentiment of choice inside the card.
11. Tie ribbon into a bow and attach with glue dot (place right below the circle set, place close enough you can slightly tuck the circle in to keep it flat)

Directions seem long, but it really doesn't take that long to make this card -- especially if you have everything cut out ahead of time. Enjoy!

Thursday, October 15, 2009

Christmas Note Pad

Wondering what you can get for your child's teacher that he or she will use but not have another 10 ties or mugs? LOL... Here's a great idea for something s/he can use that's not too difficult and doesn't take a lot of time. It also says...hey I was thinking about you.
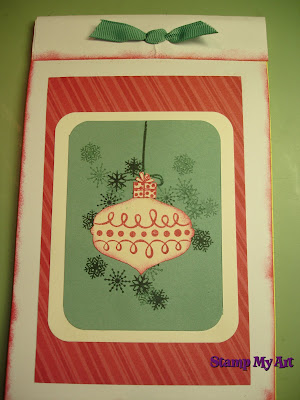


Create a note pad and you can even personalize it if you like. Yes, it does seem Christmas is a bit off, but funny thing is --- it seems to creep up slowly at first, then wham suddenly it's upon you! Besides now's a good time to look for some sales or at least keep it in the back of your mind if you run across any, LOL. :)

First, get your self a 5 x 8 note pad (or several if you need more: teacher, nurse, secretary, music teacher, dance instructor, baseball coach...)

Then with a few more supplies you're ready to start cutting, gluing and stamping...
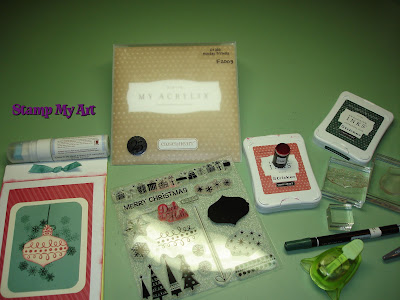


Supplies in addition to the note pad:
• A 12 x 12 piece of Colonial White Card Stock - cut as follows:
>> a piece to 5 x 8
>> a piece to 5 x 9-1/4
>> the 4 x 5 left over from the 5 x 8 -- cut to 3-1/2 x 4-1/2
>> the scrap from the 5 x 9-1/4 just save for stamping
• A piece of Juniper cut to 3 x 4
• A piece of Red (dots, stripes...) B&T Duos from Jingle Collection (or other if you prefer)
• A 6" piece of ribbon, red or green or coordinating color
• A hole punch
• A corner rounder
• Holiday Trinkets stamp set (D1366)
• Some type of adhesive (I used Bonding Memories, but tape runners work well too)
• Ink Pads: Tulip and Ponderosa Pine
• Marker: Ponderosa Pine (or you could use waxy flax if you don't want to draw)
• Dauber duo or sponge
• Scissors, My Acrylix Blocks (3x3, 2x2, 1x1)

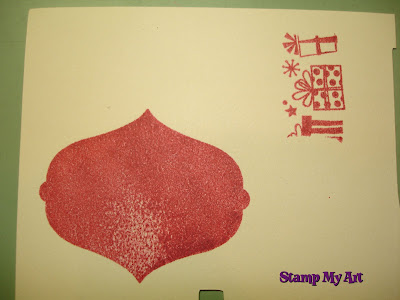
Stamp ornament image, using the tulip ink pad, on the small scrap piece of paper (left over from the 5 x 9-1/4 piece) and also choose which present you want for the top and stamp that on the scrap too. Let dry while you complete the next tasks.

Randomly stamp the snow flakes using the Ponderosa Pine on the Juniper piece. Just a couple times near the center ought to do the trick. ♥


Take the piece that you cut to 5x8 and use your black blade (the creaser blade) to create a crease at one inch. Then, take the 5x9-1/4 piece and crease at 1 inch and 1-1/4 inch. Next, still holding the 5x9-1/4 piece punch two holes on the one inch portion (this will be your top and the place the ribbon goes through).

Now, take your sponge or dauber duo and sponge just the one edge closest to the holes and sponge 3 sides of the 5x8 from the crease down around the side, bottom and back up to the other side stopping before crossing the crease (see picture above).

Next, glue the TOP EDGE only of the 5x8 piece to the front of the note pad. The next part is a little tricky but not too hard...take your ribbon and thread it through the wrong way (meaning both tails will be on the back (temporarily), then cross over on in the back and thread opposite ends back UP through the holes to create the tails you see above. Now you will glue the entire back of your note pad and place the 5 x 9-1/4 piece (lining up the edges and the folds) so that it folds over to the front and then glue the flap down on the front making a finished edge.

Whew! ....all the hard stuff is out of the way, LOL.

Now glue the red Jingle piece to the center front.

Use the corner rounder on the two remaining pieces, then glue the Colonial white to the center of the red and the Juniper to the center of the white.

Cut out your ornament - this will be the BACK. Once it's cut, turn it over and sponge the edges. Stamp the decoration in the center, and if you like...add glitter.

Cut out your chosen present. Glue to the top of your ornament. Draw a ribbon line down and two loops for a bow or use waxy flax. Then glue on the ornament.

Ta-da! all done...sounds longer written than it actually takes to complete. Give it a try. :)

Sunday, October 11, 2009

Putting the Pool to Bed for the Winter


Hard to tell from the picture, but this was taken today -- a strangely warm day in October -- as I prepare for cleaning the pool for the last time and getting ready to put it to bed for the season.

It's one of those bitter sweet moments where you look forward to one less chore on your "to-do" list, but at the same time you know the pool looks ooooh so much better with the pretty blue sparkly water than the bulky winter sleep cover.

This...


(these pictures were taken a few days ago right after a lovely storm, LOL)


...is why you put up with this in the fall even though it's still pretty nice out.


Amazingly it feels much warmer than the 60°F the thermometer shows for the outside temperature on this beautiful sunny autumn day in Pennsylvania.

Back to work...I still have some vacuuming to do, and a few other tasks before the covers can finally be pulled up and this guy put to bed for his long winter's rest.

No more diving board, no more furniture and the task of winterizing the backyard and the pool have begun and finished all in a day....

Friday, October 9, 2009

Christmas Card Extravaganza


Everyone had a great time at the Christmas Card Extravaganza. We had a room full women come to make cards.


Each Close To My Heart Consultant was stationed at a table and then groups of 4-6 women rotated to each table every 20-25 minutes.


There were some spectacular ideas out there. Wish I could have gone around myself, LOL.


In all, each attendee was able to create 12 beautifully different Christmas cards. With 12 choices, there is sure to be one that catches the eye, heart, creative mind, or time availability of the creator.


...And here are SOME of the beautiful cards we created....


I will put mine in another post.

Thursday, October 8, 2009

Cricut: Borders, End Caps, Certificates & Bags - How cool!

I'm just listening to Duran Duran and playing around with my Cricut Expression.

I've had my Cricut for a while but never seemed to venture on to more than just the basics. Well, I've had the personal "baby" Cricut for a while, but trying to save paper I often reverted back to my Ellison, LOL. Then when I saw what the Expression could do - wow! ...so much more; I couldn't wait to get it with it's new bigger size and added features. Saving paper was one of them, LOL. -- But wait...some of those features my baby Cricut had and I just never knew until I saw it on a TV program. A little quick check on the baby one while I waited for my Expression to come in and lo and behold those features are there too....wow, the things you learn on TV, hahaha.

So, now I've had the Expression since hmmmm...I think January, and what, I've still only done the basics on this machine? Well, except once when I created a name out of chipboard for my daughter's dorm mirror, which it came out pretty good except I had to hand cut it out the rest of the way. I didn't learn until about 3 weeks ago about the deep cut blade --- duh! LOL. I though I could just repeat the cut 4 times and it would work, but it was still attached. Now I know better and I won't waste so much chipboard trying to figure it out. heehehee.

So, the set I was playing with is the one that comes with the Cricut - the Plantin School Book. In addition to the alphabet it has a few other tricks it can do to make your projects fun. :)

First thing I played with was the borders. They are pretty cool and there are a lot of them. I only have picture of one, but there 10 ways you can do the borders. This one is using the Tall Ball feature --- turns the grass into flowers. :)


Next thing I played with was the certificate. Not sure I'll have a big need on this one, but hey you never know. It has some pretty neat details I suppose you could use it to frame a picture on a scrap page pretty nicely. :)


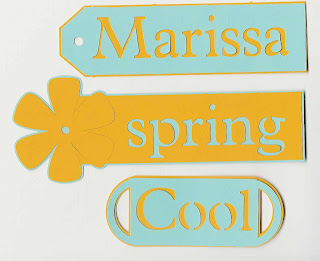
Then, I played with the end caps. This is a great feature for book marks, name tags, gift tags, labels, and hmmm... probably some other things, but anyway... it's pretty cool. I just have a couple pictured here, but there are 12 choices total.


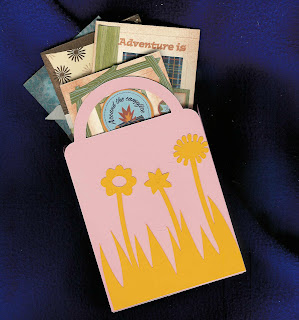
Finally, I played around with making the bag -- since I was just playing around I didn't really pick out a great color it turns out for my bag, but the bag itself was easy enough to create. One 12x12 paper makes you a 7-1/4 bag with marks so you know where to fold. Isn't it adorable? I actually cut that earlier border and put it on because I wanted to dress it up a little, but I think there is so much more dressing this bag could have. I love it! :) Then of course I stuffed it with CTMH cards. :)


Friday, October 2, 2009

Yikes!

Where did September go? Wow, that month sure went fast! It was certainly a busy month.

At the beginning of the month made a memory box for my daughter. It came out great using some of her favorite colours and theme (anything to do with moon, music, sun all good, LOL).


The center was created with folded paper to make the star, using the same CTMH paper packet to tie it all in with the theme of the memory box.


Here is the card that I made to go with it. Beautiful textured CTMH papers and buttons, some stitching, a stamped decorated old CD, with heat embossing and liquid glass applied, and the all too cute May Stamp of the Month. :)


Getting ready to run off to PSU to see her now for Parent weekend. Will be back to post the pictures from the Christmas card extravaganza last weekend. :) Have a super weekend! Smiles.

LinkWithin

Related Posts with Thumbnails