Showing posts with label Rubber Stamping. Show all posts

Saturday, September 17, 2011

One of a Kind


It's that time of year again -- Time for The Christmas Card Extravaganza.  This year I created a 4"x4" pocket card to hold a miniature candy bar and used the sentiment "One of a Kind" -- hence the name of the card.

This card uses a new stamp set just released this fall (D1480) Snowflakes (my favourite winter theme).  Also used on the card and new this year is the Red Glitz Glitter Gel as well as the brown dotted paper from the new Wonderland paper packet.

You can find the supplies and directions here:
"One of a Kind" - Pocket Card

Video instructions here:

Thursday, December 16, 2010

17 Days of CTMH Christmas Cards - Day 16: Circle Ornament Card

Advent Cards to College Day 16 - 2010


I wanted to create a card that looks like an ornament with ornaments on it so I used the CTMH Adron-able Stamp set (D1446) on a circle card (cut with my Cricut of course).

You can find the directions to this card in my Google Documents titled: Adornable Circle Ornament Card

Tuesday, December 14, 2010

17 Days of CTMH Christmas Cards - Day 14: Hidden pull-out Tag


Advent Cards to College Day 14 - 2010


Supplies
CTMH Stamp sets: Tannenbaum (B1361) pg 43 AW IB 2010; Bird Basics (D1338) pg 41 summer 2010 IB;Winter Wonder (D1241) NLA; Feathery Flakes (D1317) NLA; Solos “C” (B1227) NLA
CTMH Exclusive Inks: Sky (Z2194), Pacifica (Z2192), Cranberry (Z2116)
SU Boho Flowers punch
CTMH Piercing Tool set
Sponge
Stapler
CTMH Vineyard Berry Grosgrain Ribbon
CTMH Cardstock: Vineyard Berry, Grey wool, Moon Struck, Sky, Colonial White
CTMH Colonial White Brads
CTMH Paper Pack Magnifique
Fiskars Border embossing/punch: All-a-Fluer

Traditional A2 Card with opening at top

Sunday, December 12, 2010

17 Days of CTMH Christmas Cards - Day 12: Pull Out Tag

Advent Cards to College Day 12 – 2010


Supplies
CTMH paper pack Magnifique, Colonial White CS, Sky CS, Vineyard Berry CS, Grey Wool CS, (scrap) Moonstruck CS,
CTMH Vineyard Berry grosgrain ribbon
CTMH Exclusive Inks: Vineyard Berry, Sky, & Pacifica
CTMH Stamp sets: Bird Basics (D1338, page 41, Summer 2010 IB), Feathery Flakes (D1317, NLA), Tannenbaum (B1361, pg 43 Autumn/Winter 2010), Winter Wonder (D1241, NLA), Solos “C” (B1227, NLA)
Fiskars border punch/emboss: All a-fleur
Stapler: color your staples with a sharpie to blend in with the project
Piercing tool and pad
Sponge
Cricut Cartridge: Accent Essentials, page 79
Boho Flowers SU punch
Colonial White Brads
A post it or some other sticky to create a mask


For printable complete supplies and directions you can get them at my Google Documents: Pull Out Tag Card

See you tomorrow for Card 13!

Friday, December 10, 2010

17 Days of CTMH Christmas Cards - Day 10: All the Best Wishes

Advent Cards to College Day 10 - 2010


Today is another card created by CTMH consultant Jean.  I love the way she brought all the greens together.  Normally I'm not a real big "green" fan -- but this card is just gorgeous in person. :)  This is again using the CTMH Level 2 Mistletoe Paper pack.  What a great way to combine the green side of the snowflake papers from the pack with the cuttlebug dry embossing folder!  It looks so sharp -- what you don't see well from the picture though is the tiny little sparkles to add just a touch of glitz to this card in the lower corner of the sentiment and on the ornament.  Cardstock used: Colonial White and Olive.

Tomorrow -- back to self-created cards with recipes. :)  see you then!

Wednesday, December 8, 2010

17 Days of CTMH Christmas Cards - Day 8: Snowflakes

Advent Cards to College Day 8 - 2010

Today is another card from a workshop -- the Christmas Extravaganza we had back in September.


I cannot take credit for the design -- that was Crystal, but it was a fun card to make.  I love the Sky Blue used on this card (new color this season).  Another new thing this season is the stamp set used -- C1428, Ice Cyrstals: I just love snowflakes!  This is such a cool stamp set -- the snowflake over to the far right is a built it yourself snowflake.  ...and what a great sentiment to add for that someone special!  Supplies are simple besides the inks and stampset -- just some White Daisy cardstock to create a 5.5"x4.25" base and the one inch squares for the 3 snowflakes.  Add some gems and you have a simple card with a lot of sparkle and pizazz!

Tuesday, December 7, 2010

17 Days of Christmas Cards - Day 7: Mittens

 Advent Cards to College Day 7 - 2010

Wow, I thought I had posted this card and then I see I never actually finished the post.  oooops!


So, anyway today's card is one I made with hmmmmm....supplies I'm not sure, I made it at a workshop, so I don't actually know the sizes or papers used today.  Sorry.  I can say that the mittens were made using an oval punch and the bird punch set from Stampin' Up.  You could probably do two ovals on the Cricut for similar results though.  It's such a cute wintery card you can use it for Christmas or just winter. :)  The card is your basic 5.5"x4.25 card base.

Monday, December 6, 2010

17 Days of CTMH Christmas Cards - Day 6: Heartfelt Christmas Tree

Advent Card to College Day 6

(Sorry about the picture -- I had already mailed off the card before I realize there was glare on the right side there.)


Supplies & Cutting Directions
BASE 5" x 7" - CTMH New England Ivy (I used older CTMH paper that was textured and each side a different shade of the same color.  It matches with the New England Ivy on one side, but the other side is a much lighter color of green -- I miss those papers, I've been saving them in my stash for a special occasion -- what's more special than my daughter! :) )  You will have to cut a lighter shade of green to 2" x 7"
Barn Red CS - 2.25" x 4"
Colonial White CS - 2.25" x 4"
CTMH  Stamp Set: Heartfelt Christmas (C1378 from Fall 2009)
CTMH Exclusive Inks: New England Ivy & Vanilla Cream
CTMH Exclusive Inks Marker: Watermelon
Zig-Zag Corner trimmer by EK Success
CTMH Glitz (Stardust) Liquid Glitter
6 eyelets
Paper trimmer with scoring blade or some type of scoring system
Pop Dots -- the extra tall version

Crop-a-dile or some way to set your eyelets.

Assembly Directions
1. Stamp sentiment in lower left corner of card base with the Vanilla Cream.
2. Using your scoring blade or bone folder, score every 1/4" on the 2" x 7" piece (see picture for direction of score marks) - sponge lightly with the New England Ivy across the ridges created from scoring.  Attach to card base with the 6 eyelets and your Crop-a-dile (or eyelet setter).
3. Stamp tree using New England Ivy on both the Barn Red and the Colonial White pieces.  Cut out the tree from the Colonial White piece (cut off the dots, only leave the tree).  Color in hearts.
4. Use corner rounder on the Barn Red piece, then attach to slightly off center towards right on card base.
5. Now apply Glitz to color in the dots on the Barn Red Piece.
6. Put tall pop dots on cut out tree and attach direction over the barn red piece, then apply Glitz to all the dots on the tree as well.


Sunday, December 5, 2010

17 Days of CTMH Christmas Cards - Day 5: Oh, Tannenbaum

Advent Cards to College Day 5 - 2010


You can't really see it well from the picture (you have to look very close) but the entire tree is pierced with the paper piercing tool -- it looks cool in person, especially since it's raised off the surface to help the light shine through.  However, today's card is not my own creation.


Today's card is actually from the CTMH website video -- Art & Soul®: Stencil, Sparkle, and Shine and can be found at:  http://stampmyart.myctmh.com/MyCTMH/CTMHTV.aspx  -- once there, you can watch the video, it's a little later on in the program, and just below that there is a link to see the materials used (including the Wishes Card Confidence Program).

If you need any supplies to create your card be sure to check my CTMH site where you can shop on line any time, and remember this month is Plenty for $20 special.  Make any $20 purchase on my website and get a FREE stamp set -- yes, you read that correctly -- a FREE stamp set.  Here are the details:

Place an order of $20 or more* on your Consultant’s MyCTMH website from December 1–31, 2010, and we’ll reward you with a popular, retired D-size stamp set for FREE! Talk about getting more for your money—the free stamp set is valued at $22.95 US / $26.95 CAN! We’re sure you’ll be thrilled with the set we pick out for you. We’re also giving you FREE shipping/handling and tax on your free stamp set. That’s a lot of Plenty for your Twenty! Grab Plenty for Twenty in December by visiting your Consultant’s MyCTMH website and making a qualifying purchase today!

See you tomorrow with a new card for Advent Cards to College Day 6!

Friday, November 12, 2010

My Favorite CTMH Product - Challenge


I love to stamp!  It's something I picked up when my daughter was about 2-years-old and we were stamping with her little stampers making lots of images all over the pages for her to color.  We had fun that day and I learned something -- Stamping is FUN!  It wasn't just fun for her, but I had fun too.  We were both coloring in the images, she more than me, since that was the point of the activity, but towards the end of our "play" time I realized you can do so much more with stampers and I have been stamping since.  I stamp on cards and my scrapbooks, something I've been doing for so long I can't remember a day when I didn't decorate the pages with stamped images.

I started buying some "adult" stamps, you know the kind with the wood mounts.  You had to be careful or you would ruin the wood.  I would go to the local craft store (which back then wasn't so local, LOL), and browse through the selection of stamps.  I started stamping my Christmas cards and the hobby grew from there.

Years later my wood mount stamps collection had grown just a little, being cautious about what I selected, but also not finding a whole lot of choices I liked, when I came across D.O.T.S.

I was a girl scout leader and a fellow Girl Scout leader was doing a mother daughter event, that was a stamping event.  How perfect!  It reminded me of the day back when my daughter and I were stamping; the day that started me on the adventure in the first place.  Oh, boy was I hooked.  D.O.T.S. stands for Dozens of Terrific Stamps.  What a perfect name. The images were fantastic and the quality was super!  I learned how to clean my stamps that day.  My friend made a huge sale from me that day too as well a many others from me in the future.  Eventually, she stopped selling D.O.T.S. and I fell out of touch with the stamps because I didn't know how to get them.

Then, 5 years ago I was introduced to CTMH (Close to My Heart) when friend of mine said you have to come to my "party" it's scrapbooking stuff and I know how much you like to scrapbook.  I had never heard of CTMH, but wanted to help my friend out and I do love scrapbooking and papers.

I learned two things that day.  First, this was my official introduction to clear acrylic stamps.  I had seen them pop-up occasionally in stores, but stayed away from them.  I loved my wood mount stamps.  I could see the image, and often they had a colored-in image on top of the block giving me a little cheat sheet so to speak (LOL).  They also stored flat, so I could see them in drawers in my bookshelf.  I organized them into broad categories so I could find them fast.  That day the consultant tried to get me to buy the clear stamps and I was nope, I'm loyal to my wood mounts.  I'll buy all this other stuff from you, but you "can't make me" buy stamps...hahahaa,... well, not really, but she got the idea.

The second thing I learned that day was that I had once again found D.O.T.S.  Some of you know, but for those who do not -- D.O.T.S and CTMH are one in the same.  The founder Jeanette Lynton created DOTS in 1990, then in 1996 she created scrapbooking products, and by 2000 she combined them under one name: Close to My Heart.

Now, if you are wondering why would I pick the stamps as my favorite Close to My Heart item when I said I loved my wood mounts, that would be a good question.  The answer goes like this...

Eventually, I did give the clear stamps a try.  I was a very slow convert, but once I converted, I was hooked, and the more I stamped with them the more I was convinced this was the best thing that could have happened to the stamps.  Why?

1. The quality of CTMH stamps is still the best stamp I've ever used of any other stamp!
2. I LOVE that I can see exactly where I'm going to stamp my image. This feature is a must have for me. Unlike some stamp companies that still have solid images with their clear blocks you can see exactly where you are going to stamp an image.  I know exactly where my image is going to stamp without having an "oopsy" because it went somewhere I wasn't expecting.  I can see.  I don't just see the general area, I see everything it's Fantastic!  Also, for those occasional times when you don't make a good impression (not the stamps fault), you can see exactly where to restamp without having to waste paper making a new image.
3. Our stamps stick to our clear Acrylix blocks without any fear they will fall off while you are stamping. If I am stamping a tiny detail or a large image, they stick!  Not so with other clear stamps -- I've tried them, always good to know what's out there and ours our the BEST!  Yet they still come off easily when you want them to come off the block.
4. You can shape them (within reason of course).  I love that if I have an image with a slight curve I can then take words and "shape" them along the side so they look like they are part of the original image (following the image shape).  If I love an image and I'm trying to fit it into a tight space I can usually do that too.
5. I can make patterns by combining multiple images onto one block.  How cool is that!  It doesn't matter if I want a nature background, a birthday background or any other type, I can choose from my collection and create my own background.  I can even make backgrounds that match the patter paper I'm using with my project.
6. No worries about ruining a wood mount anymore.
7. It's easy to see what image you want to use and where to place it.  Just put the carrier sheet over the area you want to stamp and you can see if the image will fit with the style and fit within the size.
8.The stamps are easy to clean and easy to store, what more could you want from a stamp than all these qualities.


So....my favorite CTMH product is our clear My Acrylix Stamps!  Go ahead, try them, you'll be glad you did!

Tell me about your favorite CTMH product or how you used a CTMH product in a project.  Post your story in a comment below or post your story and pictures on your blog and make a comment below that connects me to your blog post link.  I will have a drawing for one Share the Magic Stamp set just for participating by November 30, 2010.


The winner will be chosen using Random.org and will be based on your posting order.

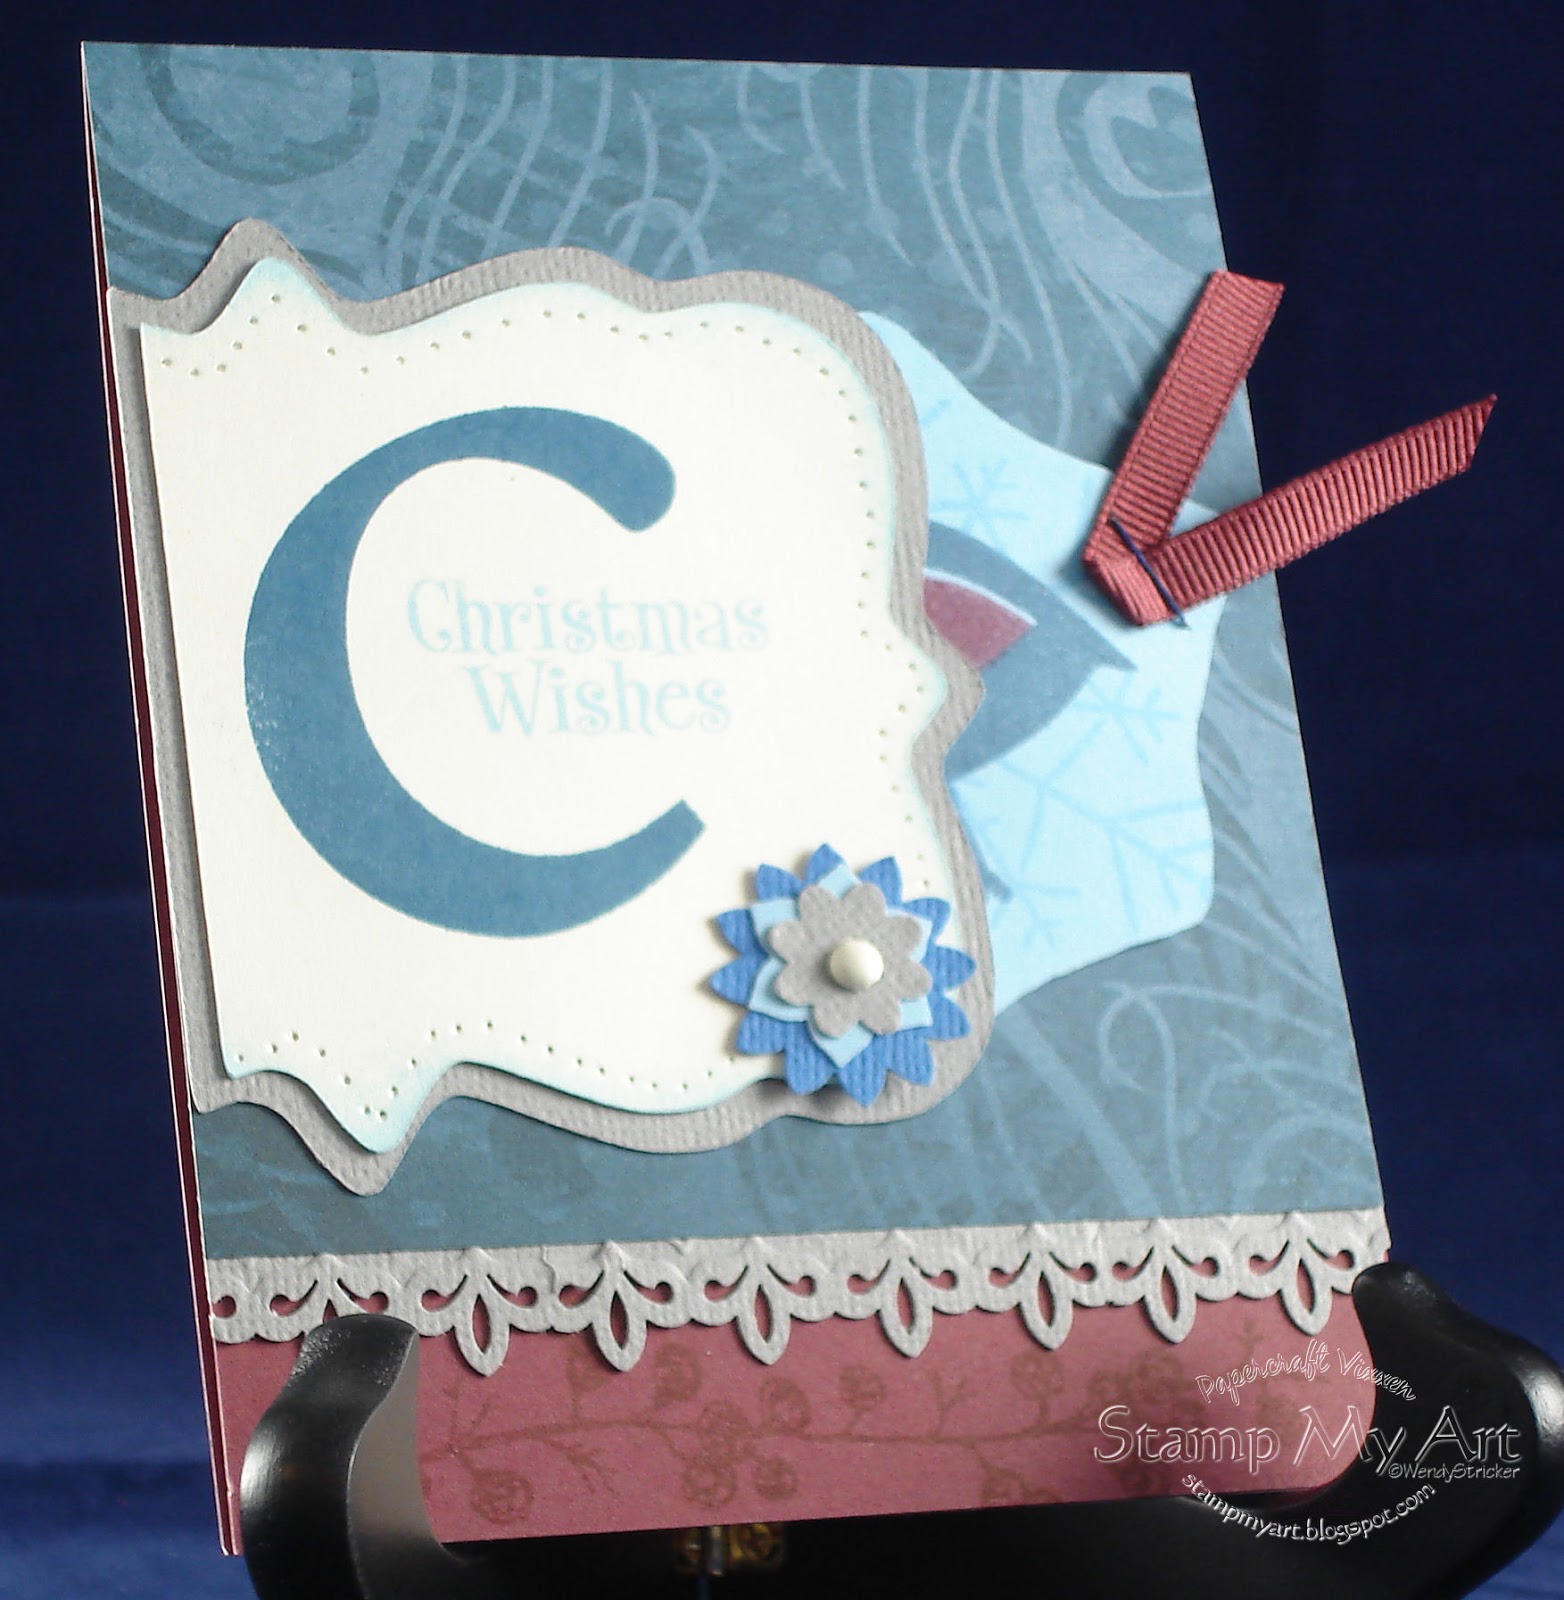
*stamp image is © CTMH

Friday, October 29, 2010

Halloween: Trick-or-Treat Toppers

Wow! It's sure good to have my computer back. I can finally post on the blog again, LOL.  That's why the Tri-fold Card post took so long.  I actually started it in September, but was waiting for my computer back so I could post the pictures. It took longer than I expected, but it's back now. Yay!


Halloween is always a fun time. I love to see the children dress up and come visiting.  It's a great way to see how the neighborhood children change over the years.

Today's project is super easy. This year I've made treat toppers and filled cello bags with the goodies.  I was able to complete 40 while watching Survivor.  You'll love how simple and quick it is to complete, but shows the kids you're thinking of them! Have fun!  Oh, yeah, how do you like those pumpkins? heeheehee...

Supplies
CTMH Black CS 5" x 4" (folded in half to 2" x 5")
CTMH Orange CS (NLA - replaced by Sunset) 4.75" x 1.75"
Purple CS (an older color I had, so I thought I'd use it up) 4.5" x 1.5"
D1319 Creepy Cobwebs Stamp Set

Stamp on the purple CS, then layer purple on orange and orange on Black, fold in half; fill cello bag with treats; place topper over opening and staple closed.

Sunday, February 7, 2010

Valentine's Day: Romantic Love or All Love?

Valentine's Day is soon here and it's just bursting for card makin'!  A lot of people think that Valentine's is only about romance, but hey, let's face it there are a lot of single people out there. ...And what about our children? ...for some mothers they are first in their he♥rt and that, while not romantic, is sure worthy of remembrance.  Remember someone special in your life this Valentines day -- it's not just about the chocolates or the push of dead flowers (sorry, I rather have them in the ground, LOL) -- give them a hug or just let them know you are thinking of them this Valentines

I made this card for my daughter who is away at college. Many of you may remember the Advent Card a Day activity I did for her at Christmas time.  While this is not a multiple-day posting of Valentines cards, you'll find that I'm always sending her something at some time or another, LOL.  She also received a box of goodies (chocolates, stuffed creatures....you know the whole Valentine gamut from mom to daughter).

Today's card seems to fit many challenges ... I guess it is just the way with Valentines. :)  Two challenges here -- Check out Just Buggin' Challenge and for Crazy 4 Challenges links over there on the left.

***update posted 2/15/10 -- Forever Friends (words are the link back to the blog) just posted their challenge today and said you may use an already posted "Hearts" card.

To start, the heart and the shapes for the sentiment were made easier thanks to my Cricut! :)


Supplies and Directions
1.  From a small piece of Chipboard, cut 2.5” heart from Cricut cartridge Accent Essentials (pg 67); use sponge applicator to color entire surface with Close to My Heart Exclusive Inks Tulip (Z1266), then glue Martha Steward Red Micro Beads and set aside to dry. (Too much glue will make it curl, but not enough and the beads won’t stick.)

2.  Stamp tag (4 x’s) from Close to My Heart Stamp Set, February Word Puzzle (D1269) using CTMH Exclusive Inks Tulip (Z1266) on a scrap of Daisy White or Baby Pink CS – then choose which words you want to put on the tags (like the Valentines candy hearts) stamp each tag.  Next, punch a small hole in top, loop a piece of matching thread through the hole, and finally attach all together with a blush mini brad.  Set aside for later.

3. Time for Cricut again: Using CTMH Daisy White CS Cut Accent 48S (pg 48) from the Accent Essentials Cartridge at 2”, and then using the CTMH Baby Pink (1299) cut at 1.75”.  Sponge edges of both pieces with the CTMH Tulip, then stamp with sentiment from CTMH Stamp Set, February Word Puzzle (D1269) and the decorative embellishment stamp from Close to My Heart Stamp Set, Cherished Flourishes (D1413).  Attach the pink CS with the sentiment to the White CS. Set aside for later.

4.  Glue Day Dream Paper Packet: Lilac/Pink B&T duo paper 1.75” x 3” to Day Dream Paper Packet: Lilac 2” x 3.25”; set aside.

5.  Now, take a piece of Daisy White CS, cut to 4.5” x 12” and fold in half to create a 4.5” x 6” card base. Then, glue Day Dream Paper Packet: Pink side of B&T duo paper 4.25” x 5.75” (X7108B) to the card base.

6. Next, using Baby Pink CS 1.5” x  4.25” (1299) take the Fiskars All a-fleur Embossing Border Punch and finish one edge.  Cut a piece of CTMH Organdy with Satin Edges Colonial White Ribbon to 5.25” and adhere to the center of the baby pink piece, folding the edges around behind to hide them.  Then, cut a piece of CTMH Blush rickrack to the same size and attach to the center of the ribbon.

7.  Time to start putting the card together.  Glue the lilac combo to the upper left area of the card, then the sentiment to the right of that centered vertically.  Next, glue the baby pink ribbon combo just below the lilac piece.

8.  Attach the tags with a piece of matching thread or similar to the ribbon.  Next take a 12” piece of organdy ribbon and the same length of blush rickrack and tie them around the ribbon into a bow (leaving the rickrack dangle free.  Push the tags over towards the bow.  Use pop-dots on the back of the heart and the put in place over towards the right side of the card.

Thursday, December 17, 2009

Sending the Advent Calendar on the Road - Day 17 & Just Buggin' Challenge #17 -Inky Fingers

This tri-fold card is brought to you by Cricut...LOL, naaahhh, by me, but Cricut was a big help. I just LOVE the center cut feature. Ever since I discovered that and how to use it, it's been soooooo amazing. Hey, I even pulled out some of my old wooden stamps for this...you can't get them anymore, but I love my stamps and can't part with them, LOL. (you can find the link to Just Buggin' Blog over to the left)

(Scanner does a nice job of capturing the overall card, but it does not do justice to the sparkles)

Well, can't believe I'm up to day 17 only one more card to go, whew....feels like a whirl wind of a couple weeks, hahahaa... So, now off to the actual card. I did need a few extra photos to actually show this card with all the different folds...the pictures from the scanner leave the sparkles flat and the actual camera photos make sparkles SPARKLE, but somewhat seem to change the colors! I'm still working on the lighting issues, someday I'll figure it out, LOL. :)


Soooo, are you ready for the long list of supplies and directions?

Supplies
Cricut Cartridges:
♦ Georges and Basic Shapes for opening in card face (pg 101) and creating oval (pg 114) template
♦ Snow Friends for snowman
♦ When it's Cold Outside 2009-2010 for snowflake
Close to My Heart Card Stock: Indian Corn Blue, White Daisy, Holiday Red
Cereal box, hahaha, yes -- I'm a recycler and this makes great chipboard....heeheehee
Stem from a large leaf -- gotta love nature!
Large red jewel
Red satin ribbon
Cotton Ball
Close to My Heart Winter stamp set (D1040) - believe and snowmen
Close to My Heart Frosty Friends stamp set (D1073) -- Snow family and snowflakes
Peachy Keen Stamps PK-520 Winter Face Assortment Pkg - for the face (of course, LOL)
Judi♥Kins 2203J Swirls (wood mount) Large background stamp
Close to My Heart Exclusive Inks Ink pads: White Daisy, Outdoor Denim, & black
Close to My Heart Exclusive Inks Markers: Orange and Outdoor Denim
Liquid Glue
White Acrylic Paint and wide brush or sponge applicator
Dauber Duo sponge
Stipple Brush
Martha Stewart Blue Topaz fine glitter
Martha Stewart Snowflakes
Adhesive
Pop-dots
Glue dots

Directions
• Card base from Indian Corn blue cut 4" off one side of a 12"x12" to make an 8"x12" piece, then cut an 1/8" off the 12" side. The First fold will be at 3-3/4" and the second one at 4" -- you will have 3 sections. The shortest section (the 3-3/4") will be the inside flap, the larger section the 4-1/8" is the outer part of the card and the part you will be CUTTING next.
• On the Cricut with the Georges cartridge in, find the desired shape -- figure out where the center of the space is on your card, and where you want your opening located --- then make sure you press the CENTER button on the cricut... set aside for now.
• Time for cereal -- Not! LOL... Get that cereal box and put it to some good use, cut it about 5"x5" lots bigger than you need and place inside surface UP on the Cricut cutting mat.
• Now use the Cricut "When it's Cold Outside" cartridge to cut the chosen snowflake.
• Paint entire surface with the White acrylic, while it's drying you have plenty more to do....
• Back to the Cricut - Cut out desired snow man and various accessories
• I wanted my hat and vest to have some decoration, which is where I used my old wooden background stamp -- you can leave yours plain if you like.
• Stamp the snowman's face (black) using the Cricut lines as a guide -- the straight line is where I put the mouth. Color in nose (orange).
• Put your snowman together using a good strong adhesive (I used my ATG) - don't put his arms on just yet, but do glue his hands to the leaf stem so they can be drying
• Use the Blue Denim ink to lightly sponge the edge and bottom of the snowman -- I just did the right side to give him a little shadow and some depth dimension
• Free hand cut a pile of snow, sponge the edge, giving a little more ink to some ares to create depth. Use your finger to spread some liquid glue around on the surface and then apply the snow flakes, let dry while you add pop-dots to the back of the snowman and apply his arms with plain ole scotch tape (no one will see). Turn him over and add cotton to top of hat and brim if desired. Let dry
• While snow man is drying check to see if snowflake is dry - if so, sponge the edges (inside and out) with the Denim Blue (you may not see this after you add the glitter, but glitter does tend to fall off during shipping or use, so it's better to have the snowflake still finished once this starts happening -- actually it looks pretty good without the glitter and if you're not a glitter nut like me you can just leave it plain, LOL) -- apply glue with a sponge applicator or just smear around with your finger both are good. :) Add glitter and let dry -- it won't take too long. Add a pop dot to the back, and then add your Jewel to the center (or not if you decided not to go with glitter) using the white glue. Let it dry while you move on to the next part of the card.

• Use the Cricut to create an oval stencil for making the shadowy white space to stamp "believe". I cut my oval at 2" -- see what works for you. Make sure you cut it with lots of border around the edges so when you stencil you stay within the area and don't have shadows outside where you want them.
• figure out your placement of the "believe" then use your stencil and Daisy White with the Stipple brush to stipple the area. Heavier towards the outer edges of the oval and fading to less and then none in the center.
• Stamp "Believe" first in Daisy white (to create a snowcap), clean your stamp then stamp again using the Denim -- great thing about the CTMH My Acrylics - You can SEE right where to place your image (move the second one just slightly down or up and over a bit so you create a shadow to make it look like snow sitting on the word) add ellipses with the Denim Marker. Now on to the inside first flap...
• With the card folded, find the first flap you will see when the card is opened. At the bottom, stamp: snowmen in Denim. Then, using the Denim marker create 3 more ellipses and add the word "in" just above Snowmen.
• Stamp the Snowflakes first in Denim, then in White to create a muted soft look - in upper corner.
• Add Ribbon around Snowman's neck for a scarf.


• Put snowman in position -- matching hat to open area, so you can't tell if it's Santa or ehem...the snowman, LOL.
• Put the Snowflake on front, just by window.

Write a nice message in side and send it off with lots of hugs!

Wednesday, December 16, 2009

Sending the Advent Calendar on the Road - Day 16

The little penguins in this card are having "snow" much fun sledding down the hill...they're doing a real stand-up act on this easel card, hahaha.


Easel cards are a neat way to get a little more mileage from your card by using part of the inside to help support the outside picture. I love ♥ the way they are 3-dimensional in a unique way, but on this card, I even made my snow & penguins 3-dimensional for a little additional pop-up on this card.


Only two more cards and days until I leave to Pick up my daughter or do you say one day? Hmmmm...it's definitely 2 more until we see her, but there is only 1 day in between, LOL. ...Whichever -- so the 18th will be here, and I will be on a long-long drive there and then back again in the same day.


Supplies & Directions
♥ Close to My Heart Daisy White CS (1385) --to create card base, card front, penguins, and pop-up snow: 4" x 8"; score and crease in center and then choose one side and score and crease in the center of that section. Cut 2nd piece to 4"x4" and mount to bottom portion of front -- this is the part you folded the 2nd time.
♥ Close to My Heart Indian Corn Blue CS (1284) -- for background 4"x3"
♥ Close to My Heart Winter Fun Stamp Set (C1330)
♥ Close to My Heart Exclusive Inks Moonstruck Ink Pad (z2134) - "Winter is *Snow* Much Fun"
♥ VersaMark Ink Pad
♥ Embossing pen
♥ Embossing Powder Disco Black by Stamp-n-stuff
♥ Embossing Powder Snowflake Tinsel by PSE (Personal Stamp Exchange)
♥ Cuttle Bug Embossing Folder "Snowflakes"
♥ Snowflake brad
♥ Close to My Heart Daisy White bitty brad from Brad Assortments -- Essential (z1219)
♥ Dimensionals or pop-dots (foreground snow and penguins)
♥ Chalk - blue
♥ Close to My Heart Exclusive Inks Markers: Orange (z2338) beaks and feet, Holiday Red (z2327) hat & scarf if you don't use ribbon, Dutch Blue (z2319) and Star Spangled Blue (z2349) hat, scarf and puffs of snow detail with shadows using both blues
♥ 6" Red satin ribbon 1/8" wide for penguin's scarf -- or you can just use the scarf you stamp
♥ Piercing tool set (make a hole for snowflake and bitty brads)

♥ Emboss CTMH Indian Corn Blue with the snowflakes and mount on top portion of front of card.
♥ Pierce the center of one of the snowflakes and add the snowflake brad.
♥ Cut 4"x3" piece of Daisy White into shape of snow banks and hills, draw little tufts of snow randomly with the blue markers, next highlight with blue chalk, and then stamp saying. For extra on sparkle use the embossing pen to go over a couple of the bumps and then use the snowflake tinsel; use pop-dots to pop from bottom portion of front of card
♥ Stamp Penguin image with VersaMark, apply the Disco Black and heat emboss.
♥ Use the embossing pen to color in faces (except eyes) and bellies of penguins, sprinkle with snowflake embossing powder and heat again.
♥ Finish coloring in the penguins and cut out
♥ Add ribbon around neck of 2nd penguin
♥ Adhere plenty of pop-dots and place penguins wher ethey look good on the hill
♥ Stand up card how you want it to look, then make a place in the center for the brad.
♥ Pierce hold for brad, insert brad and card will now stand using the brad to keep it from slipping

Have a great day. Happy Holidays!

Monday, December 14, 2009

Mojo Monday 117 - Gear Up For Christmas

As you may know from reading Sunday's blog, I just found Mojo Monday a few days ago and now it's Monday again -- Already!!! The link for the blog is over on the left a little ways down.

Also from hopping around on other blogs I came across the Forever Friends Challenge. It was an anything goes challenge which you can find here: Photobucket


Today's card is more masculine, hence no sparkles, LOL. :)


Supplies
5" x6.6" card base
Close to My Heart Stamp Sets:
♦ Tool Time (c1314) - hammer, saw, and screwdriver
♦ Holiday Trinkets (D1366) - Christmas
♦ Gear Up (C1353) - Gears and gear up
Close to My Heart Exclusive Inks:
♦ Clover Meadow Marker
♦ Clover Meadow Ink Pad
♦ Twilight Ink Pad
Close to My Heart Tinkerin' Paper Packet Level 2 (x7113B)
Ribbon
ShrinkyDinks - Frosted
Silver cording
Screw top brads
Threading Water Border punch
Pop-dots


You can visit Mojo Monday and check out their site and current challenge via their link over there on the left column towards the bottom. :)

Saturday, December 12, 2009

Mojo Monday 116

This is my first ever Mojo Monday. I just happened upon it this week when I was visiting some blogs from FaceBook, and one of them mentioned Mojo Monday. What a neat idea!

Here is my try at it....


I created this card with my daughter in mind. She is away at college and getting ready for her finals (all this week). She loves penguins and loves to ski. She asked if we would take her skiing when she is home on break. So, I thought this little skiing penguin from CTMH would be perfect. I've been making her a different card every day since the 1st of December because she is missing the advent calendar at home. It has been fun making a new card a day and this was a neat kind of fun because it was like having a little help thinking of it with the pattern already there to get me started. Since I am making this also for my daughter I will not be posting the regular Advent Calendar Card Away At College that I've been posting.

Supplies
Close to My Heart Aspen Paper packet Level 2 (x7103B)
Close to My Heart December Word Puzzle stamp set (D1313) - sentiment
Close to My Heart Winter Fun (C1330) - Penguin
Close to My Heart Exclusive Inks Outdoor Denim stamp pad (z2140)
Close to My Heart Exclusive Inks Dutch Blue marker (z2319)
Close to My Heart Exclusive Inks Orange marker (z2338)
Close to My Heart Exclusive Inks Honey marker (z2362)
Close to My Heart Colonial White grosgrain ribbon (from the colonial collection z1126)
VersaMark Ink Pad (z891)
Cuttle Bug Embossing Folder Snowflakes
Pop dots or some kind of dimensional
Stampendous Kaleidoscope Transparent Embossing Powder

You can find the template and the contest here:


Mojo Monday Blinkie.

Sending the Advent Calendar on the Road - Day 14

Well, yesterday (Friday, 11 December) was the last day for PSU regular classes, so next week all week is finals week. My daughter's last final ends at 4:30 next Friday --- way to have the very last final, LOL...poor kid -- all her friends will already be gone home when she is still there taking that last final.

As you know these cards are running ahead of schedule by 2 days to account for mail....so we will finish the cards a couple days before she actually finishes classes, just in case any of you are following along and creating your own cards.


So here ya' go on to today's card...Sexy Santa all done with her shopping!

(hard to see the detail with a scanned picture, but the ornament has little diamond sparkle chips and is done in liquid glass, also the fur trim on the girl's dress all glitter)

Today for some reason I went a little pink, heehee... Just pulling out and using up some of my old stash....hmmmm some of it I wonder what I was thinking when I bought it, LOL. I'm glad to finally have my papers organized so that I can actually find them. It makes it much easier to use them up. The more I use the old stuff the more I see why other CTMH consultants are purists on the Close to My Heart Products. Wow! You sure can't beat the quality. I like some of the designs of my older stuff, but then they don't seem as "rich" in color as the CTMH stuff and so I end up using CTMH papers instead of using up my miscellaneous supplies, LOL. Today, I did actually use some other papers mixed in with the CTMH stuff. :) You'll have to click on the image to make it bigger to actually see the glitter effects and the liquid glass...neither show up in the small size.


Supplies
Mostly papers I have around don't know colors or names, sorry
CTMH Jingle Paper Level 2
Close to My Heart Holiday Jingle Stamp Set (C1371) - HoHoHo saying
Close to My Heart Ms. Holiday Cheer (D1374) - for the Shopping gal, this is one of my favorites released this fall
Threading Water edge punch
Close to My Heart Colonial White grosgrain ribbon
Sparkles
White glitter chips (Martha Stewart)
Chalks
Close to My Heart Exclusive Inks Holiday Red Stamp Pad
Close to My Heart Exclusive Inks Black Stamp Pad
Liquid Glass (one of my all time favorite things to do to create dimension in scrapbooking)
Pop Dots


Directions
◘ Stamp girl, color with chalk, cut out, apply glue with small paint brush add glitter; let dry
◘ Stamp HoHoHo (on CS sponged with the Holiday Red ink around edges and attached to darker CS) and add sparkles to the dots on the ornament, let dry
◘ Edge punch a 1" piece of coordinating paper
◘ Glue main color over entire card base and add a the punched piece
◘ Attach ribbon to the Jingle paper and then glue in the center of the card base
◘ Add the girl with pop dots
◘ Attach the HoHoHo, apply liquid glass

Send off with lots of hugs! :)

Friday, December 11, 2009

Sending the Advent Calendar on the Road - Day 13

Today I started in one direction and didn't like how the card was turning out...so as I was moving things around and trying to achieve a specific look, I realized if I remove a card stock here and add an extra wide ribbon there...well, that's all it took to get the card rolling in the right direction.

Sometimes these things come to me as I'm making them. Sometimes they are inspired by another card I've seen or sometimes like today...I think I'm going to do a specific thing, only it turns out it doesn't look the way I thought it should, and I have to make some changes to get back on the right track.

So, on to today's card...


Supplies
5.5"x6" card base
4.5" x 4.5" Close to My Heart Holiday Red CS (1274)
4.25" x 4.25" Close to My Heart Colonial White CS (1388)
Velum
Wide wired seasonal ribbon, edges folded under to match the width of the card
21" of grosgrain ribbon, cut in to three 7" sections
Close to My Heart Holiday Commentary Stamp Set (C1379) - Christmas
Close to My Heart Rustic Flowers Stamp Set (D1186) - large pattern & open flower
Close to My Heart Exclusive Inks Holiday Red Ink Pad (z2127)
Close to My Heart Exclusive Inks Sunflower Ink Pad (z2150)
Close to My Heart Exclusive Inks White Daisy Ink Pad (z2163)
Close to My Heart Edge Distresser (z1297)
Chalks - medium green
Button
Zots glue Dots
Terrifically Tacky Tape
Adhesive
small clear sparkle


Directions
♥ Glue the Wide ribbon to the top edge or the far right edge of the card using the Terrifically Tacky Tape (this is great for mounting unlike surfaces)
♥ Distress the edges of both the Red and White CS
♥ Stamp the large decorative background with the Sunflower Yellow onto the Colonial White, let dry
♥ Stamp the Large loopy flower on the velum with the White Daisy ink; when dry, cut out around the flower just outside of the inked area (you may have to leave sit for a bit or use a heat tool to speed the process)
♥ Using the medium green chalk, chalk over the yellow you stamped on the Colonial White CS earlier, fuzzing out the edges a bit
♥ Use a glue dot to adhere the button to the flower and another glue dot or two to adhere the flower to the center of the stamped CS.
♥ Stamp Christmas towards the bottom
♥ Glue set to card base
♥ Tie all three ribbon pieces together in one large knot and adhere to card with glue dots
♥ Glue small sparkle to the dot on the "i" in Christmas

Enjoy!

Thursday, December 10, 2009

Sending the Advent Calendar on the Road - Day 12

Shake, shake --- shake your snowman....LOL. Today I made a shaker card. Lots of fun to play with. Shake this way - shake that way...shaka-shaka, watch the snow falla. :) A bit more difficult to actually see the shaky part in a still photograph. Soooooo, scroll to the bottom for a little video clip of the shaking part.


(Ooooh, so bummer....I had the directions all typed up and FireFox crashed before I could save and grrrr...they are all gone. hahahaha....so, let me know if it's missing stuff because on the repeat I may have thought I did it, but it didn't get back in...sorry.)


Supplies
Close to My Heart Daisy White CS (1385)
Close to My Heart Key Lime CS (1235)
Close to My Heart Merry Pursuits Stamp Set (B1313) -- Build a snowman elf
Close to My Heart Holiday Trinkets Stamp Set(D1366) -- Snowflakes, trees, dots, & message
Close to My Heart Exclusive Inks Markers: Citrus Leaf (z2312), Bamboo (z2303), Holiday Red (z2327)
Close to My Heart Exclusive Inks: Clover Meadow Ink Pad and Black Ink Pad
VersaMark Stamp Pad
Zig Embossing Pen (Z724)
Sparkles
Embossing heat tool
Embossing Powders: snowflake glitter and clear
Chunky Glitter
Grosgrain ribbon
ProvCraft Terrifically Tacky Tape (1/8")
Cricut Cartridge: Wild Card
liquid glue

Directions
♦ With the Wild Card cartridge in the Cricut, cut out the Birthday card (page 40) at 8.25" (you will need a 10" x 11" card stock)
♦ Use the Clover Meadow Ink to stamp the dots just under the window, the trees towards the bottom of the card, and the message inside the card.
♦ Cut the White Daisy CS 1/8" bigger than the opening. Stamp the Elf/snowman (line it up in the window to make sure you don't have any open edges showing; all you should see is the white from the image CS, not the green from the inside of the card) -- color in desired colors.
♦ Cut Transparency about 1/8" bigger than the opening. Line up with opening making sure it completely covers the opening, use a small piece of tape on one edge to hold in place for the next step; the tape is not staying.
♦ Using the VersaMark and the small snowflakes -- randomly stamp the snowflakes on the top part of the card letting a couple hit the transparency. Sprinkle with the snowflake glitter. Now remove the transparency from the card being careful not to touch the embossing powder -- you will need to heat emboss separate from the card as the card will tolerate more heat. Heat emboss the card, then holding the heat tool at a distance and moving often heat the transparency. If it warps, turn it over and heat a little more to help it reshape or while it's still warm press under some heavy books.
♦ Match the edges of the transparency to the window area and the overlapped stamped snowflakes. Use the Terrifically tacky Tape on the FRONT to hold in place (the best stuff to use for this).
♦ Now place a small amount of chunky glitter in the center.
♦ Put the Terrifically Tacky Tape on the FRONT of the CS with the image on it; line up your edges, and make sure your image looks the way you want, and then seal in place.
♦ Decorate the trees with the sparkles/glitz and add a bow -- Shake-away!


Monday, December 7, 2009

Sending the Advent Calendar on the Road - Day 9

Today's Advent card is a simple card, you just need to have a few supplies and it's quick to put together.


Supplies
Provo Craft Cuttle Bug embossing Folder Sledding
Snowflake punches
Leaf Punch
Red Pom Poms (5mm)
Zots Adhesive Dots
Adhesive
Close to My Heart Colonial White Grosgrain Ribbon (z1126)
3"x2" Close to My Heart White Daisy CS (1385)
4"x5.5" Close to My Heart Dutch Blue CS (1241)
Close to My Heart Jingle B&T Duos Paper -- green side of presents for leaves (Level 2 Paper pack x7115B)
Chunky Glitter & snow glitter embossing powder for snowflakes
Close to My Heart Frosty Friends Stamp Set (D1073)
Close to My Heart Exclusive Inks Star Spangled Blue Ink Pad
Close to My Heart Exclusive Inks Markers: Holiday Red (z2327), Orange (z2338), Citrus Leaf (z2312), Clover Meadow (z2313)

Pop Dots

Directions
First, punch and glue chunky glitter to the larger snowflake and let dry while you punch and heat embossing powder on the smaller snowflakes (I used a sponge and VersaMark on the smaller snowflakes to adhere the embossing power before it was heat set); set aside. Punch leaves on Jingle Present paper (use the green side). Stamp and color your snow person.

Next, fold the card base (4"x5.5" Dutch Blue CS) in half and then emboss on the front half with the Cuttle Bug Sledding Folder.

Finally, arrange elements where you like, glue all into place -- use pop dots for the snowflakes.

A quick and simple card to send ♥

LinkWithin

Related Posts with Thumbnails