Here is a project I just recently finished...A themed table using my Cricut and a few other things.
I made the center piece with a clear planter, some blue sand (3 bags full), a multiple shades of blue tones candle, and some shells (all bought at Michaels Craft Store). Then I created Ariel with my Cricut (Dreams Come True cartridge) and CTMH papers, stickles, and some Martha Stewart's glitter.
I even had some fun making the fake drink with some imitation water (that I mixed some food coloring, that was fun to get the layers right, LOL) and fake ice cubes.
Ariel is made from CTMH papers, except for the eyes, which I didn't like how they turned out, so I took a white gel pen and colored in her eyes, then CTMH Star Spangled Blue Exclusive Marker for the colored part of her eyes... I used two shades of of green for her tail (New England Ivy & Clover Meadow), then used two colors of Glitter. Boy were those lips tiny. :)
I used three shades of red (Cranberry, & Tulip) for our Friend Sebastian... here he is holding the menu...
I used CTMH papers and the Cricut (Dreams Come True cartridge) to make the menu as well... I also tore the paper and sponged the edges to make it look worn and used some stickles for the glitter on the flowers and shell.
We had a lot of fun coming up with the idea for what to have for our meal...
Here is what our menu says:
For your starter this evening you will enjoy Sebastian’s fresh Seaweed Salad made of dried Wakame Seaweed, rice wine vinegar, sesame oil, soy sauce, and ground white sesame seeds with a garnish of starfish.
You will find a beautiful array of colors in your beverage this evening as you enjoy Flounder’s virgin Sunset Cocktail – a bright mix of Lemon-lime soda with fresh squeezed orange juice and a splash of grenadine, topped with a fresh fruit garnish.
Enjoy our signature entrée of Coconut Shrimp served with a Mushroom Herb Risotto, Sweet Onion Marmalade, and garnished with a Potato Crisp as your main course.
Finally, finish your meal with everyone’s favorite -- Triton's Sweet Temptations, a wonderful Trio of Crème Brûlée, Chocolate Mousse and Praline Petite Choux.
All items are edible, although, there are a couple I'm not sure I would actually want to eat, LOL.
**you can find a close up of the Ariel Name Tag and a link to directions on my blog post: Ariel Name Tag CTMH Veranda
Wednesday, July 28, 2010
Saturday, July 24, 2010
Ariel Name Tag - CTMH Veranda
Ariel Name Tag and
Binder Clip Stand
Our local Fair is coming next week and every year my daughter and I enter a few of our crafts for fun. One of the things the Fair does is have a table decorating contest where there is a theme to follow and you have certain guidelines you have to meet.
This year's theme is "A Disney Dinner". You have to decorate your table based on the theme, invite a specific person and plan a meal as well as decorate the table center piece including table ware. All items must go with the theme.
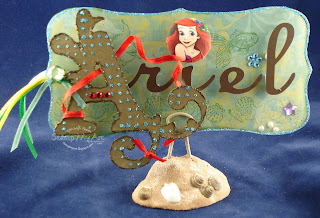
We are doing the Little Mermaid. So, for part of the table we had to have a name tag of our guest. Today's blog is about the name tag I created using CTMH and Cricut; my two favorite crafting tools.
Ariel's name tag is a 3-dimensional tag using clear plastic or acetate to create a floating feeling -- like being under the sea.
I made the base using a binder clip and Fimo (aka Sculpey), some sand and shells.
I used the CTMH Paper Packet Veranda which is
perfect with it's pretty bluish-green and yellow patterned paper and
matching and contrasting browns to create the base for the name tag.
The 3 Cricut Cartridges I used are:
The 3 Cricut Cartridges I used are:
Wall Decor and More (I just love the monogram
letters on this cartridge) - for the "A"
Accent Essentials for the
base shape
Songbird for the "riel"
You can see more pictures and download the full directions with materials
necessary here: Ariel
Name Tag using CTMH papers and Cricut die cutting machine includes the
directions for the binder clip stand.
Enjoy!
Labels:
Close to My Heart,
Cricut,
CTMH,
How-to-Tutorials,
Paper Crafting
Tuesday, July 20, 2010
Two minute Tuesday: Scrapbook Tip #2
Time for another Two minute Tuesday
Scrapbook tip 2:
Gather Your Supplies
What kind of feeling do you want to
present? Do you want lots of embellishments or minimal? Color
coordinated, mirrored pages, pop-out, pop-up, or ??? Close to My Heart has all
kinds of scrapbooking supplies (check out my website to see what we have), plus there are so many places you can pick
things up in craft and specialty stores, and even other types of retail or
superstores.
Here are some supplies (in addition
to your photos) that you will need to have on hand:
Decorative papers -- variety of
colors and patterns
Cardstock -- variety of colors and
textures
Scissors
Scrapbook album (post bound vs
strap hinge)
Acid-free Adhesive
Here are some additional supplies you might
want to also have:
Decorative scissors
Rubber Stamps
Stamp pads
Ink
Acid-free Markers
Boarder punches
Plastic template sheets
Stickers
Buttons
Fabric
Rick-a-rac
Fancy hole punches
Photo corners
Corner punches
Ribbon
Brads
And sooooo much more
Some tools that are great to have on hand:
Paper Trimmer (Guillotine, rotary, arm cutters & stack cutters)
Paper Trimmer (Guillotine, rotary, arm cutters & stack cutters)
Cricut with lots of cartridges (some people have other die cutting
systems, but I love my Cricut)
Cricut Design Studio (CDS) or Gypsy for your Cricut
Cuttlebug with lots of embossing folders
Decorative Bar Stapler
Crop-a-dile
Thursday, July 15, 2010
Cricut Pagoda Cartridge: Celebrate Kanji
This is a 4.25" x 5.5" card made completely with the Cricut Pagoda Cartridge.
Supplies
Cricut Cartridge: Pagoda
Various CS -- I used a mix of CTMH and some other CS I had laying about
Directions
1. Fold a 4.25" x 5.5" piece of CS in half to create your card base.
2. Cut a 4.75" Kanji Word (pg 27) using the feature key and pressing the Doll button -- on base colored CS
3. Cut a 1" Shift-Kanji (pg 27) using the feature key and pressing the doll button -- on white CS
4. Cut a 1" Kanji using (pg 27) the feature key and pressing the doll button -- on red CS
5. Layer the Kanji over the Shift-Kanji
6. Layer the Kanji Word (celebrate) over a lighter colored CS or decorative paper that is cut to fit the word
7. Cut a piece of CS to match the Kanji word @ 5.25" x 4" and attach to front of card base
8. Cut one curtain and one curtain shift (pg 70) with color of different shades from the same color family; layer
9. Using pop-dots mount the curtain set onto the card base set towards the upper most portion of the card
10. Attach the Kanji word set (Celebrate) to the lower portion of the card front
11. Finally using pop-dot attach the Kanji to the upper most portion of the curtain (see picture)
12. Write whatever you desire on the inside.
Have fun and while you're at it....celebrate!!!
Friday, July 9, 2010
Mojo Monday 146: Unforgettable Aspiration
I have been so busy I've not done a Mojo Monday in a while, so I really need to get my groove back, LOL. Today's card is for Mojo Monday 146 -- you can find a link to Mojo Monday along with several other challenge blogs on my links page.
Supplies
CTMH Cocoa CS
CTMH Unforgettable kit
CTMH Aspiration Stamp Set (C1340)
CTMH Exclusive Inks Stamp Pads: Juniper & Watermelon
Martha Stewart's Glitter
small brad
Check out the Mojo Monday blog to see the template.
Sorry about the picture...too much light for the sparkles, they reflected more light onto the picture and made it come out somewhat different than it actually looks. It looks pretty cool in person with the sparkles. I really need to work on how to get the sparkles to "sparkle", LOL. :)
Sorry about the picture...too much light for the sparkles, they reflected more light onto the picture and made it come out somewhat different than it actually looks. It looks pretty cool in person with the sparkles. I really need to work on how to get the sparkles to "sparkle", LOL. :)
Thursday, July 8, 2010
Pagoda Cartridge: Kanji Journey Tree
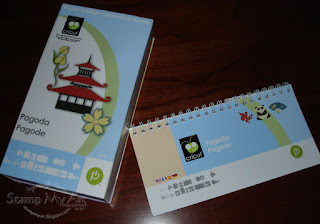
Last week I received the Pagoda Cartridge compliments of ScrapbookPal.com and I've been exploring all the neat images on this cartridge for a few days.
Today I thought I would also try out some metal with the Cricut. In case you didn't know, the Cricut will cut thin metal and you can even dry emboss it with your Cuttlebug to add even more dimension. The picture doesn't show nearly the depth you get in person, but you can still see some of the effect in the picture below.
Supplies
Cricut Cartridge: Pagoda
Cuttlebug Embossing Folders: Distressed Stripes and Mesh
CTMH Card Stock: Clover Meadow (1229), Cocoa (X5642), Ponderosa Pine (1276), and Colonial White (1388)
CTMH Tan Hemp (Z280)
CTMH Exclusive Inks: Ponderosa Pine (Z2145)
Making Memories Metal Sheets: aluminum or copper (comes in a package of 2 -- one thick and one thin -- I used the thin)
CTMH Stamp Set: Solos "J"
EK Success border punch (unfortunately they don't name their punches, it's the one that has a wavy edge and dots running along the edge -- I just call it wavy-dots, LOL)
1/8” Hole punch
Pop Dots
Adhesive
Go to Kanji Journey Foil Tree for the PDF version to see the full directions and print out if you like.
Tuesday, July 6, 2010
Two minute Tuesday: Scrapbook Tip #1
Organizing photographs can be a daunting task, but with a little time and a few tips you can conquer your photo piles and organize them so they are easy to share with others.
Do you have drawers, boxes, bags, or surface areas full of photographs? Scrapbooking is a fun and easy way to preserve your mementos and memories. Whether with your family, friends, neighbors or any combination of these, creating a scrapbook can be a great way to look back and say: "hey remember when...".
First, get those photos out of their nooks and crannies and out of the sun too (UV is not any better on photos than people). Find an acid-free/scrapbook-safe accordion organizer. If you are behind you might want several. The file will probably be some type of plastic -- again, just make sure it's photo-safe.
Now, for step one,....
Choose a theme
Sort your photos by date, activity, holiday, special event or "??". One way doesn't work for every person and sometimes you may even have more than one way you want to display your photos. For example, I use both date and activity. I have specific albums for certain events (they just also happen to be in chronological order too, LOL).
I label my files by year and inside I put one month for each of the 12 slots. Then, throughout the year as I go somewhere or do something that month, I place the item in the appropriate month. When I print out my pictures I also put them in the appropriate month. If I see an embellishment that goes with a specific set of pictures, I also put that with the correct month. This keeps everything together and organized so I don't feel overwhelmed or worried that I will lose something or forget where something goes if I don't get to it right away. I also make journal notations that I place with the month, that way if I don't get to the scrapbook right away, I still remember.
Some examples of my Themes and how I have my scrapbooks organized are:
Vacation
Birthday (for my daughter only)
Heritage
Christmas (all the photos I receive from friends or family in Christmas cards - in order, it's nice to look back at how they change from year to year)
House (from building to all the changes we make over the years)
General year-to-year (every day stuff, or day trips)
Skiing
That's just a few ideas, but don't forget to make it more personal. What things are special to you or your family? Save invitations, party napkins, movie ticket stubs and put them in your folder too it can be a fantastic journey full of fun memories. Good luck and see you soon for another Two minute Tuesday Tip.
Thursday, July 1, 2010
Playing with My New Pagoda Cricut Cartridge & Exploring ATC
Woo-hoo--I won something! I can't believe I actually won something, LOL. I'm usually the one that luck runs the other direction, hahahaha. Scrapbook Pal you are the best!
The cartridge is the Pagoda Cartridge. I can't wait to make some more things with it.
I received this fabulous cartridge compliments of ScrapbookPal.com. You should check out their website because they also have some great prices on Scrapbooking supplies including the new Cricut Cartridges. Another great thing is you get free shipping on orders over $25.00 -- way cool!
They ship super fast too. My cartridges are always here in 2 days.
I decided to make my first ever ATC (Artist Trading Card). Size is standard at 3.5" x 2.5" and the rest is up to the creator. I had heard so much about this medium in the past that I considered the idea after exploring it a bit, but never was daring enough to give it a try. I finally figured it wasn't going to happen all by itself .
I used some papers I had from before my CTMH days, so I can't tell you what papers I used, but all the images are from the Pagoda cartridge. I also used a corner rounder on both the main background and the layer.
Cut the Kanji at 1" (pg 35, press Feature Key, then cut one with and one without the shift key on)
Cut the Panda at 1" also (pg 35, black without shift and white with shift key on)
Cut the bamboo at 2.5" (pg, 48 no shift) -- then use a gelly pen to add details as you like
Cut one solid color @ 2"x3" and glue to the base.
Then, glue the bamboo in place.
Next, use pop dots to put the Kanji and the Panda in place.
Finally, and write the word "Dream" with a black gelly pen
Subscribe to:
Posts (Atom)


