Showing posts with label Christmas. Show all posts

Saturday, September 17, 2011

One of a Kind


It's that time of year again -- Time for The Christmas Card Extravaganza.  This year I created a 4"x4" pocket card to hold a miniature candy bar and used the sentiment "One of a Kind" -- hence the name of the card.

This card uses a new stamp set just released this fall (D1480) Snowflakes (my favourite winter theme).  Also used on the card and new this year is the Red Glitz Glitter Gel as well as the brown dotted paper from the new Wonderland paper packet.

You can find the supplies and directions here:
"One of a Kind" - Pocket Card

Video instructions here:

Thursday, December 16, 2010

17 Days of CTMH Christmas Cards - Day 16: Circle Ornament Card

Advent Cards to College Day 16 - 2010


I wanted to create a card that looks like an ornament with ornaments on it so I used the CTMH Adron-able Stamp set (D1446) on a circle card (cut with my Cricut of course).

You can find the directions to this card in my Google Documents titled: Adornable Circle Ornament Card

Wednesday, December 15, 2010

17 Days of CTMH Christmas Cards - Day 15: A row of Snow Friends

Advent Cards to College Day 15


Interesting thing about this card.  When I first made it -- I didn't have it colored in and I liked it that way, then I thought well maybe it's too plain, so I colored it in.....oh, no!  I rethought maybe I should have left them plain.  So, time being what it is this time of year, I put it off for a few days before I went back to the beginning and started all over and made the plain one.  Well, as it turns out -- I ended up liking the colored one better, LOL.  So, now I have another to color, hehehehe...

You can find the supplies and directions to this card in with my Google Documents: Snow Friends

Only two more days of cards.  See you tomorrow with a Circle Ornament card. :)

Tuesday, December 14, 2010

17 Days of CTMH Christmas Cards - Day 14: Hidden pull-out Tag


Advent Cards to College Day 14 - 2010


Supplies
CTMH Stamp sets: Tannenbaum (B1361) pg 43 AW IB 2010; Bird Basics (D1338) pg 41 summer 2010 IB;Winter Wonder (D1241) NLA; Feathery Flakes (D1317) NLA; Solos “C” (B1227) NLA
CTMH Exclusive Inks: Sky (Z2194), Pacifica (Z2192), Cranberry (Z2116)
SU Boho Flowers punch
CTMH Piercing Tool set
Sponge
Stapler
CTMH Vineyard Berry Grosgrain Ribbon
CTMH Cardstock: Vineyard Berry, Grey wool, Moon Struck, Sky, Colonial White
CTMH Colonial White Brads
CTMH Paper Pack Magnifique
Fiskars Border embossing/punch: All-a-Fluer

Traditional A2 Card with opening at top

Monday, December 13, 2010

17 Days of CTMH Christmas Cards - Day 13: Snow Days Shaker Card


Advent Cards to College Day 13 - 2010


Supplies
CTMH Stamp Sets: Snow Days (C1420) pg 23 AW Idea Book, Snow Flurries (D1384) pg 41 AW Idea Book
CTMH Exclusive Inks: Spring Iris & Black
CTMH Card Stock: Spring Iris & White Daisy
CTMH White Daisy Grosgrain ribbon
Fine Sandpaper 220 grit
Martha Steward Mica
Chunky Glitter (mix with the mica to create the snow)
Foam strips to create the pocket area for the shaker part of the card
Terrifically Tacky Tape
Piece of plastic to create window area
Cuttlebug embossing folder

Sunday, December 12, 2010

17 Days of CTMH Christmas Cards - Day 12: Pull Out Tag

Advent Cards to College Day 12 – 2010


Supplies
CTMH paper pack Magnifique, Colonial White CS, Sky CS, Vineyard Berry CS, Grey Wool CS, (scrap) Moonstruck CS,
CTMH Vineyard Berry grosgrain ribbon
CTMH Exclusive Inks: Vineyard Berry, Sky, & Pacifica
CTMH Stamp sets: Bird Basics (D1338, page 41, Summer 2010 IB), Feathery Flakes (D1317, NLA), Tannenbaum (B1361, pg 43 Autumn/Winter 2010), Winter Wonder (D1241, NLA), Solos “C” (B1227, NLA)
Fiskars border punch/emboss: All a-fleur
Stapler: color your staples with a sharpie to blend in with the project
Piercing tool and pad
Sponge
Cricut Cartridge: Accent Essentials, page 79
Boho Flowers SU punch
Colonial White Brads
A post it or some other sticky to create a mask


For printable complete supplies and directions you can get them at my Google Documents: Pull Out Tag Card

See you tomorrow for Card 13!

Saturday, December 11, 2010

17 Days of CTMH Christmas Cards - Day 11: Jingle Tree

Advent Cards to College Day 11 - 2010


Today is another card that had caught my eye from the CTMH website.  Although the decorative papers are no longer available for purchase, I love the pretty blue hues in the Jingle paper packet.  …And it was sitting here in my stash just waiting for some love.

Other supplies used were the chocolate grosgrain ribbon, pewter brads, and gems.  I used a white Gel pen to create faux stitching and a Stampin’ Up punch for the ornament.  Since it was the picture that caught my attention I didn’t go looking for the directions or supplies, I just created the card with a 6”x6” card base and went from there.

I can’t believe we are doing day 11 already!

Friday, December 10, 2010

17 Days of CTMH Christmas Cards - Day 10: All the Best Wishes

Advent Cards to College Day 10 - 2010


Today is another card created by CTMH consultant Jean.  I love the way she brought all the greens together.  Normally I'm not a real big "green" fan -- but this card is just gorgeous in person. :)  This is again using the CTMH Level 2 Mistletoe Paper pack.  What a great way to combine the green side of the snowflake papers from the pack with the cuttlebug dry embossing folder!  It looks so sharp -- what you don't see well from the picture though is the tiny little sparkles to add just a touch of glitz to this card in the lower corner of the sentiment and on the ornament.  Cardstock used: Colonial White and Olive.

Tomorrow -- back to self-created cards with recipes. :)  see you then!

Thursday, December 9, 2010

17 Days of CTMH Christmas Cards - Day 9: Dahlia Fold

Advent Cards to College Day 9 - 2010

Today's card is also designed by another CTMH Consultant (Jean) at the Christmas Card Extravaganza we had back in September.  Isn't it fantastic how a few circles can turn into such a beautiful flower!


This card uses the CTMH Mistletoe Level 2 paper pack (Fall 2010) and Colonial White CS.  My favorite papers in this pack are the red snowflakes, used here in this Dahlia fold card, and the green musical notes.  Card base is 5.5"x4.25"

Wednesday, December 8, 2010

17 Days of CTMH Christmas Cards - Day 8: Snowflakes

Advent Cards to College Day 8 - 2010

Today is another card from a workshop -- the Christmas Extravaganza we had back in September.


I cannot take credit for the design -- that was Crystal, but it was a fun card to make.  I love the Sky Blue used on this card (new color this season).  Another new thing this season is the stamp set used -- C1428, Ice Cyrstals: I just love snowflakes!  This is such a cool stamp set -- the snowflake over to the far right is a built it yourself snowflake.  ...and what a great sentiment to add for that someone special!  Supplies are simple besides the inks and stampset -- just some White Daisy cardstock to create a 5.5"x4.25" base and the one inch squares for the 3 snowflakes.  Add some gems and you have a simple card with a lot of sparkle and pizazz!

Tuesday, December 7, 2010

17 Days of Christmas Cards - Day 7: Mittens

 Advent Cards to College Day 7 - 2010

Wow, I thought I had posted this card and then I see I never actually finished the post.  oooops!


So, anyway today's card is one I made with hmmmmm....supplies I'm not sure, I made it at a workshop, so I don't actually know the sizes or papers used today.  Sorry.  I can say that the mittens were made using an oval punch and the bird punch set from Stampin' Up.  You could probably do two ovals on the Cricut for similar results though.  It's such a cute wintery card you can use it for Christmas or just winter. :)  The card is your basic 5.5"x4.25 card base.

Sunday, December 5, 2010

17 Days of CTMH Christmas Cards - Day 5: Oh, Tannenbaum

Advent Cards to College Day 5 - 2010


You can't really see it well from the picture (you have to look very close) but the entire tree is pierced with the paper piercing tool -- it looks cool in person, especially since it's raised off the surface to help the light shine through.  However, today's card is not my own creation.


Today's card is actually from the CTMH website video -- Art & Soul®: Stencil, Sparkle, and Shine and can be found at:  http://stampmyart.myctmh.com/MyCTMH/CTMHTV.aspx  -- once there, you can watch the video, it's a little later on in the program, and just below that there is a link to see the materials used (including the Wishes Card Confidence Program).

If you need any supplies to create your card be sure to check my CTMH site where you can shop on line any time, and remember this month is Plenty for $20 special.  Make any $20 purchase on my website and get a FREE stamp set -- yes, you read that correctly -- a FREE stamp set.  Here are the details:

Place an order of $20 or more* on your Consultant’s MyCTMH website from December 1–31, 2010, and we’ll reward you with a popular, retired D-size stamp set for FREE! Talk about getting more for your money—the free stamp set is valued at $22.95 US / $26.95 CAN! We’re sure you’ll be thrilled with the set we pick out for you. We’re also giving you FREE shipping/handling and tax on your free stamp set. That’s a lot of Plenty for your Twenty! Grab Plenty for Twenty in December by visiting your Consultant’s MyCTMH website and making a qualifying purchase today!

See you tomorrow with a new card for Advent Cards to College Day 6!

Saturday, December 4, 2010

17 Days of CTMH Christmas Cards - Day 4: Snow Friends

Advent Cards to College Day 4 - 2010

Sending a Christmas card each day my daughter is away at PSU.  We are up to day 4.  She'll be coming home on the 17th, so follow me through each day as I make a new card.  At the end I have a special surprise that I've made for my daughter (so she has somewhere to keep all the cards).  You'll have to wait since I don't want to spoil her surprise. :)

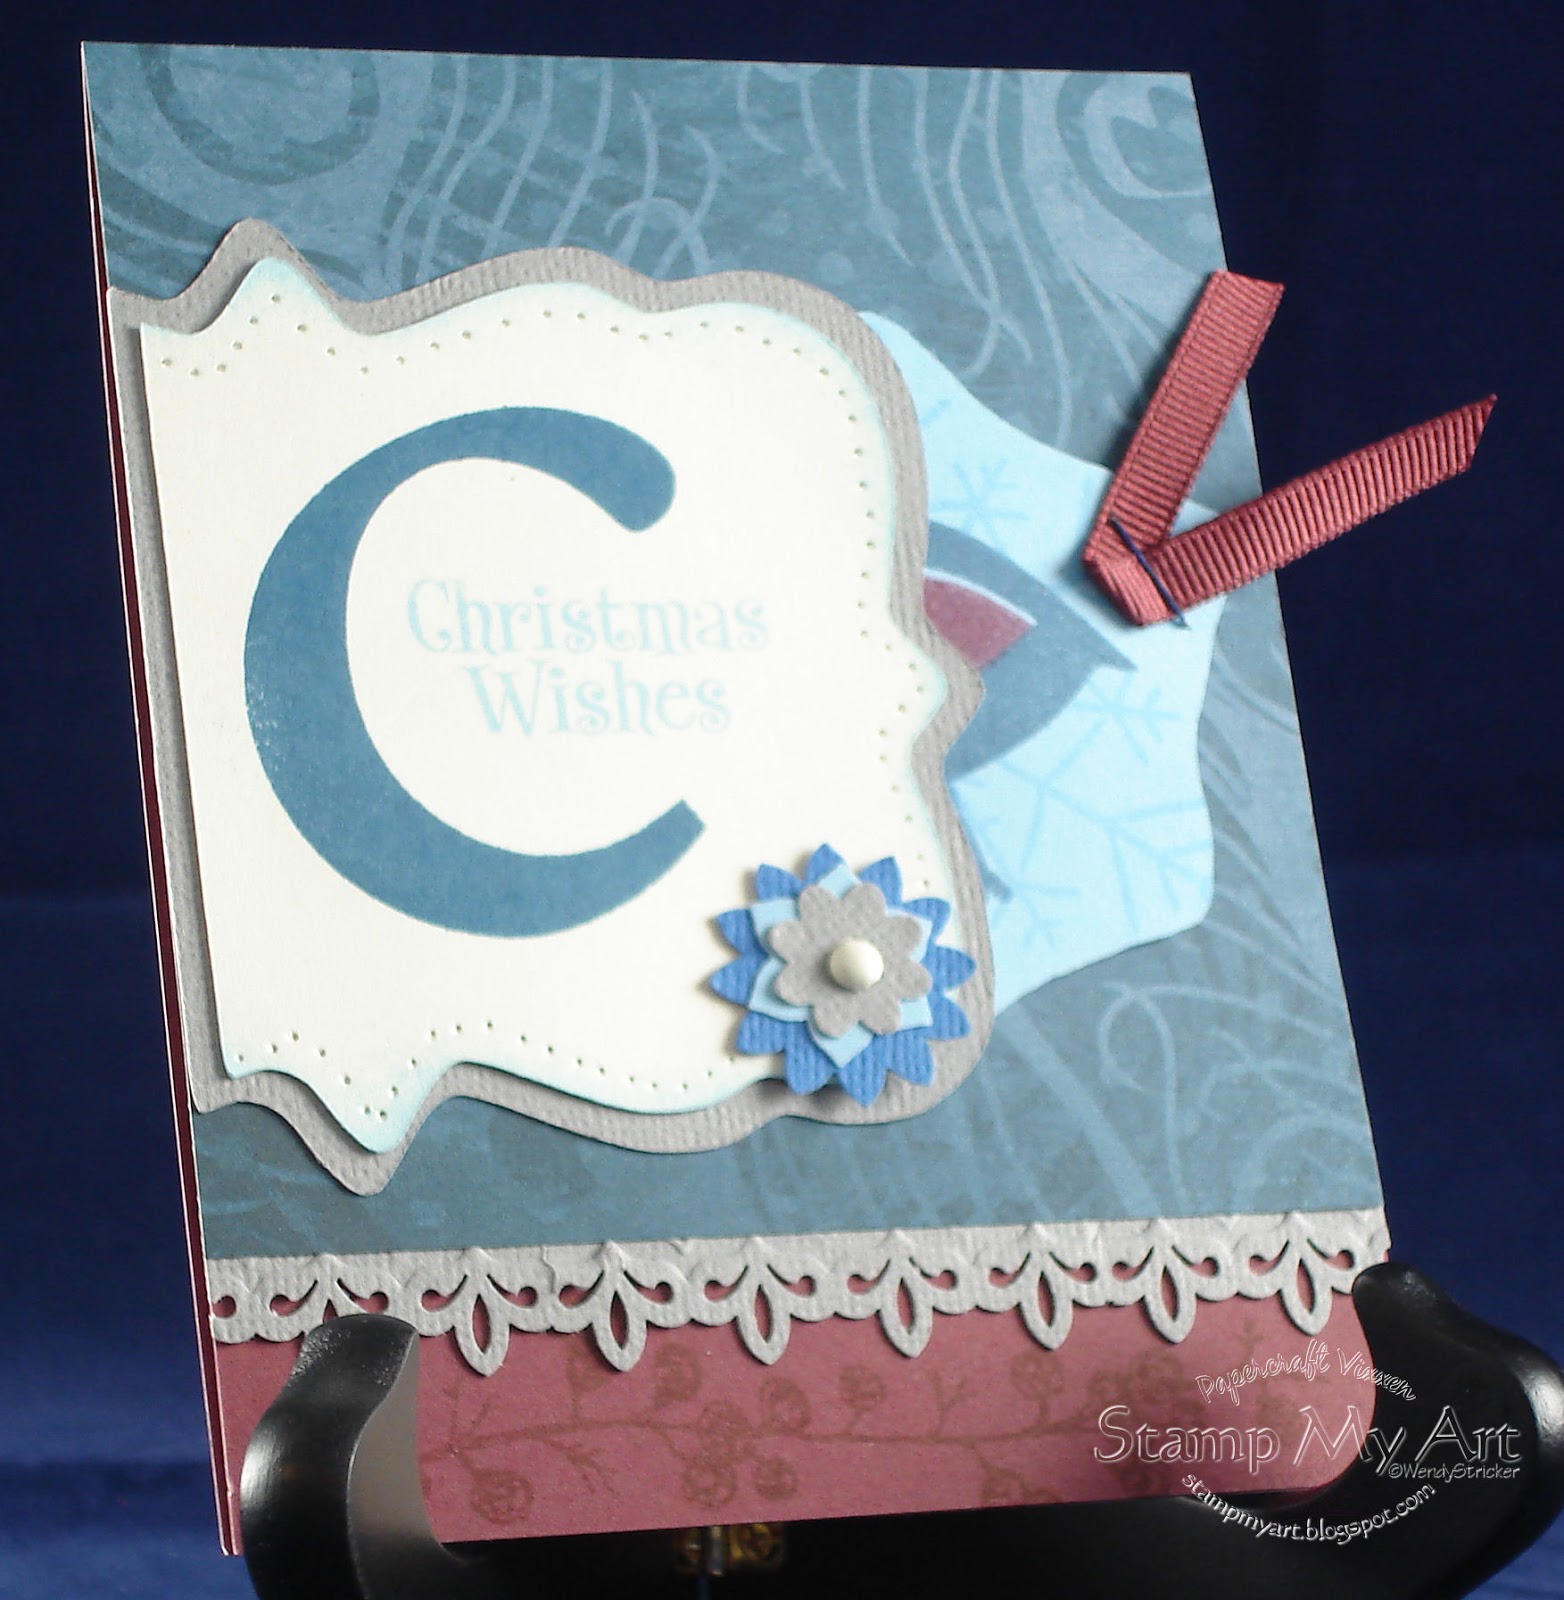
Today's card was inspired by Jeanette Lynton.  I saw this lovely card on the CTMH website and just had to make it for my daughter (well something very similar since I couldn't find the measurements and directions; it's not saying they're not out there somewhere, I was just in a hurry to beat the postal carrier to the mailbox, LOL).


Supplies
CTMH Stamp Sets: Snow Friends (D1244), January Word Puzzle (D1268), & Spot On Backgrounds (D1280)
CTMH CS: White Daisy, Cocoa, Desert Sand, Juniper
CTMH Exclusive Inks: Juniper, Cocoa

CTMH Ribbon: White (Grosgrain) & Hollyhock
CTMH sanding kit
CTMH Brads: Pewter & Basic Collections
CTMH Glitz Stardust Liquid Glitter
Cricut Cartridge: When it's Cold Outside (2009-2010)
Cuttle Bug Embossing Folder: Ice Crystals

From Base up
Card base is 5.5" x 5.5"
Juniper layer is 5.25" x 5.25" and is embossed with the Ice Crystals, then sanded
Desert Sand layer is 5.25" x 3.5"
White Daisy is 5.25" x 1 5/8"
Juniper is 5.25" x 1.25" and is stamped with Juniper using the Spot On Backgrounds
Cocoa Layer is 2.75" x 2.75"
Daisy White Layer is 2.5" x 2.5 and is stamped in Cocoa with the Snow Friends and sponged with Coca, color as desired.
Use Cricut to cut snowflakes.  Attach snowflakes with the brads and put two brads on the snowman's belly for his buttons, then assemble card as shown.  Finally, apply Glitz to the brads (except the snowman).

Thursday, December 2, 2010

17 Days of Christmas Cards - Day 2

Advent Cards to College Day 2 - 2010

It's day two of the Advent Card adventure! Today's card uses Close to My Heart's October Stamp of the Month Magic Moments and B & T papers from the Mistletoe Paper Packet.


Supplies
CTMH: Mistletoe Paper pack (level 2), ribbon – I used Hollyhock Twill, Liquid Glass, Brown Bag
and Tulip Exclusive Inks, Share the Magic Stamp Set – D1443 (SOTM – October)
Others: Martha Stewart Pine Branch Punch, Chalks, Adhesive, Glue Dots

The directions and supplies can be found in printable form at Window to Rudolph Cards Google Document.

Wednesday, December 1, 2010

17 Days of Christmas Cards - Day 1

Advent Cards to College Day 1 - 2010

Time to start a new school year of Advent Cards.  Those of you following me last year might remember it was my daughter's first year of being away at college.  This, then led my daughter to the realization that she would not be able to participate in the yearly Advent Calendar.  Life changes and you have to find ways to change with it.  So began our new plan:  I decided I would make cards and send them to her every day.  For the entire time she is at college during the month of December I send a card for each day. ...and so started the new custom of Advent Cards.


Today I sent off the first card, it's one I actually posted earlier -- you can find it at this link: Old World Santa

I will post a new card tomorrow.  Today's picture is of my beautiful daughter from her 19th birthday back in September when we went up to visit her for the weekend.

Tuesday, September 28, 2010

Christmas Extravaganza 2010

This year's Christmas Card Extravaganza was another success!


Thirty-six participants made a total of 12 beautiful cards each as they rotated between 7 different consultants.


Everyone had the opportunity to try out the new papers, stamp sets, embellishments and other new supplies recently released this September.


Door prizes and give-a-ways peppered the room with the exciting possibilities of the new products and creative ideas.


A great day with plenty of opportunities to meet new people on the venture too.


The first 6 cards were made in the morning session before lunch break.


Around noon everyone stopped to enjoy a lunch break with food supplied by the consultants and then it was back for the 2nd half of the day to make the remaining 6 cards.


If you didn't make it to this year's Extravaganza, you'll want to mark your calendar for next year so you too can get in on all the creative fun!


Join us next September to make your very own stash of Christmas cards.


You'll get some great ideas and have a head start on those special cards for those extra special people in your life.


Look at all the smiles on everyone -- you know it was a great day!


Be sure to visit my website at stampmyart.myctmh.com to check out the new Idea Book for all the great new products!


Saturday, September 25, 2010

Old World St. Nicholas Card


Today is our Christmas Card Extravaganza.  We will be having an all day card workshop where participants will be making cards all day, have lunch, get free gifts and door prizes.  It's sure to be a fun day for all!  I will post pictures of the event and cards created in the next few days.

To create an old world feel on the above card -- I used chalks to color in the image, which I stamped using Cocoa Ink for the Santa image.  I also used the edge distresser on the New England Ivy to further enhance the feel.

Basic Supplies Needed

Colonial White CS (1388)
New England Ivy CS (1282)
Mistletoe Level 2 Paper Pack (X7130B)
Colonial White Ric-rac (Z1126)
Cranberry Exclusive Inks Stamp Pad (Z2116)
Cocoa Exclusive Inks Stamp Pad (X2114)
Watercolor Pencils (3509)
Exclusive Inks Markers – variety of colors
Fun Flock (Z263)
Edge Distresser (Z1297)
Corner Rounder (Z1311)
St. Nick Stamp Set (B1356)
Sponge (Z697)
Chalks & Pine Branch Punch
Adhesive (wet & dry versions) -- wet works best for the ricrac


You can Download full directions via the Google Docs link: Old World St. Nicholas

Saturday, December 26, 2009

The Last Christmas Card


I waited to post this card since it's the one I made for my daughter for Christmas day, then things were so busy I never had a chance to get on the computer, LOL. So, now it's late, sorry =( ...but maybe you can use the idea for another holiday or even for next year.

It's a square card with half circle flaps that fold in from all four sides. I created the shape using the Cricut Design Studio, but you could probably do the same by creating a square and then using a circle template on each of the four sides to create the half circles.

I ran two of the side flaps through the Cuttle Bug using the Snowflake embossing folder. I also used the Winter saying embossing folder for the inside on an iridescent Mylar.

The trees are from the Cricut Winter Collection using the layers and cutting off the top loop, then sprinkling with mica chips for snow effect.

The penguin is from Close to My Heart Winter Fun stamp set (C1330), which I used VersaMark ink and then embossed in black before using the water color pen to color the beak, feet, scarf and hat.

When I finished I mounted the whole card on a square piece of Colonial white to off-set all the blue when the card is in the closed position. The trees and the penguin are what make it so the card can stand on its own.

Here's a picture of the inside view; the Mylar looks really neat in person.


Here are a couple more views one from the side of the trees and one from the side of the penguin.


Hope you have fun making your own!

Wednesday, December 16, 2009

Sending the Advent Calendar on the Road - Day 16

The little penguins in this card are having "snow" much fun sledding down the hill...they're doing a real stand-up act on this easel card, hahaha.


Easel cards are a neat way to get a little more mileage from your card by using part of the inside to help support the outside picture. I love ♥ the way they are 3-dimensional in a unique way, but on this card, I even made my snow & penguins 3-dimensional for a little additional pop-up on this card.


Only two more cards and days until I leave to Pick up my daughter or do you say one day? Hmmmm...it's definitely 2 more until we see her, but there is only 1 day in between, LOL. ...Whichever -- so the 18th will be here, and I will be on a long-long drive there and then back again in the same day.


Supplies & Directions
♥ Close to My Heart Daisy White CS (1385) --to create card base, card front, penguins, and pop-up snow: 4" x 8"; score and crease in center and then choose one side and score and crease in the center of that section. Cut 2nd piece to 4"x4" and mount to bottom portion of front -- this is the part you folded the 2nd time.
♥ Close to My Heart Indian Corn Blue CS (1284) -- for background 4"x3"
♥ Close to My Heart Winter Fun Stamp Set (C1330)
♥ Close to My Heart Exclusive Inks Moonstruck Ink Pad (z2134) - "Winter is *Snow* Much Fun"
♥ VersaMark Ink Pad
♥ Embossing pen
♥ Embossing Powder Disco Black by Stamp-n-stuff
♥ Embossing Powder Snowflake Tinsel by PSE (Personal Stamp Exchange)
♥ Cuttle Bug Embossing Folder "Snowflakes"
♥ Snowflake brad
♥ Close to My Heart Daisy White bitty brad from Brad Assortments -- Essential (z1219)
♥ Dimensionals or pop-dots (foreground snow and penguins)
♥ Chalk - blue
♥ Close to My Heart Exclusive Inks Markers: Orange (z2338) beaks and feet, Holiday Red (z2327) hat & scarf if you don't use ribbon, Dutch Blue (z2319) and Star Spangled Blue (z2349) hat, scarf and puffs of snow detail with shadows using both blues
♥ 6" Red satin ribbon 1/8" wide for penguin's scarf -- or you can just use the scarf you stamp
♥ Piercing tool set (make a hole for snowflake and bitty brads)

♥ Emboss CTMH Indian Corn Blue with the snowflakes and mount on top portion of front of card.
♥ Pierce the center of one of the snowflakes and add the snowflake brad.
♥ Cut 4"x3" piece of Daisy White into shape of snow banks and hills, draw little tufts of snow randomly with the blue markers, next highlight with blue chalk, and then stamp saying. For extra on sparkle use the embossing pen to go over a couple of the bumps and then use the snowflake tinsel; use pop-dots to pop from bottom portion of front of card
♥ Stamp Penguin image with VersaMark, apply the Disco Black and heat emboss.
♥ Use the embossing pen to color in faces (except eyes) and bellies of penguins, sprinkle with snowflake embossing powder and heat again.
♥ Finish coloring in the penguins and cut out
♥ Add ribbon around neck of 2nd penguin
♥ Adhere plenty of pop-dots and place penguins wher ethey look good on the hill
♥ Stand up card how you want it to look, then make a place in the center for the brad.
♥ Pierce hold for brad, insert brad and card will now stand using the brad to keep it from slipping

Have a great day. Happy Holidays!

LinkWithin

Related Posts with Thumbnails